Browsing
Browsers power the Data Catalog. They let you easily search, glance, import datasets or jobs.
The browsers can be “enriched” with external catalog/metadata services.
Catalogs
Tables
The Table Browser enables you to manage the databases, tables, and partitions of the metastore shared by the Hive and Impala. You can perform the following operations:
-
Search and display metadata like tags and additional description
-
Databases
- Select a database
- Create a database
- Drop databases
-
Tables
- Create tables
- Browse tables
- Drop tables
- Browse table data and metadata (columns, partitions…)
- Import data into a table
- Filter, Sort and Browse Partitions
Data Catalogs
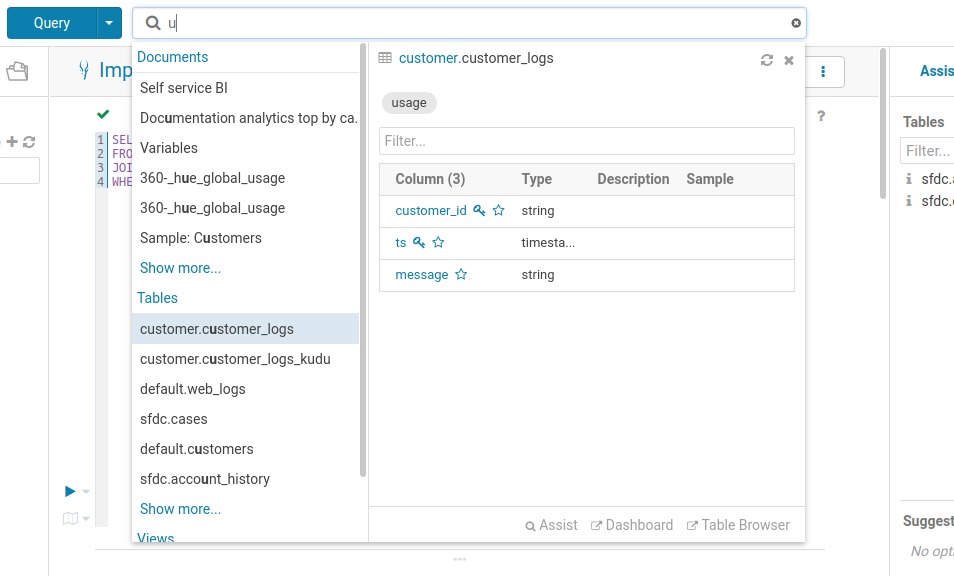
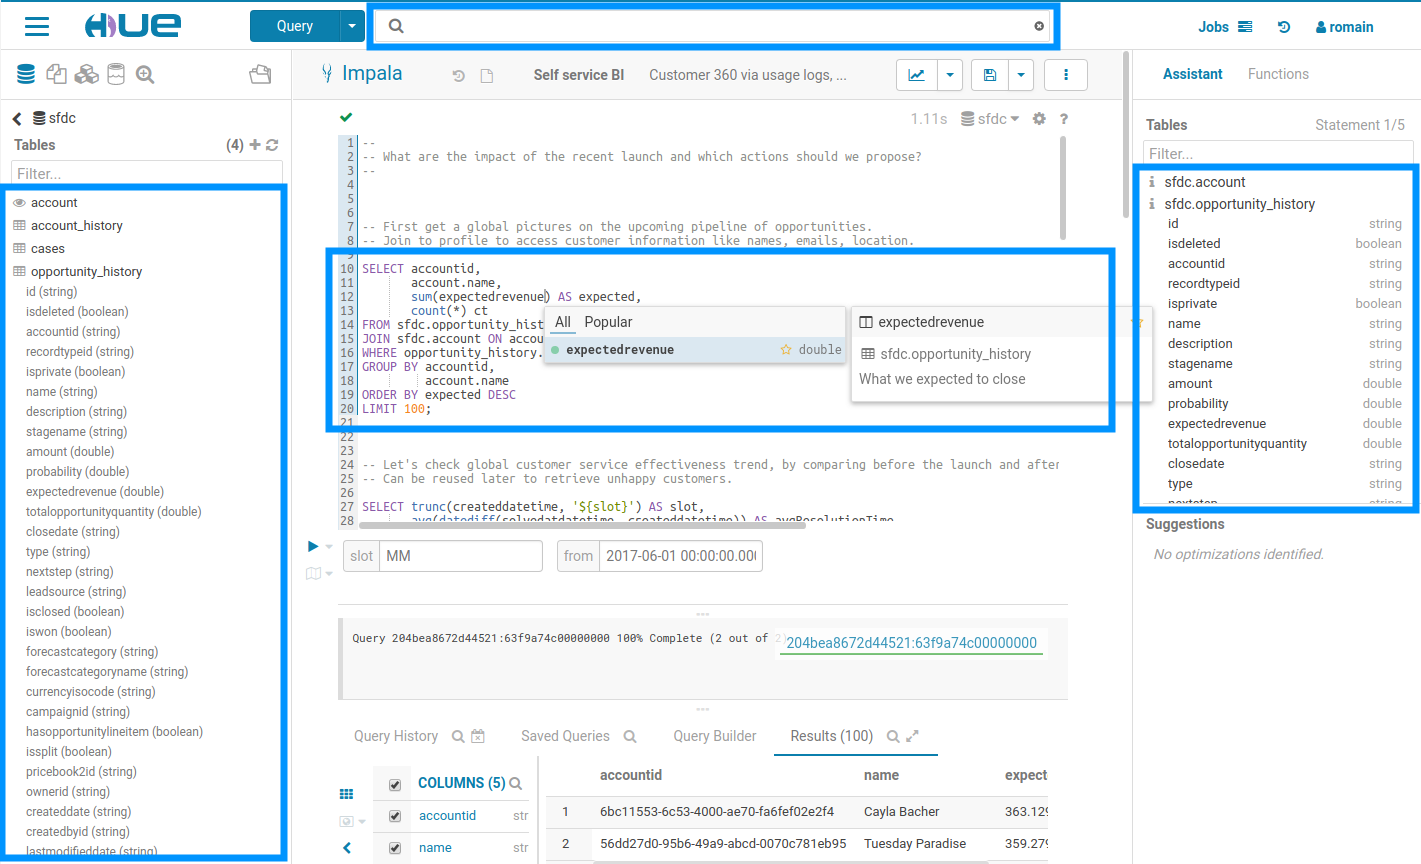
Before typing any query to get insights, users need to find and explore the correct datasets. It is accessible from the top bar of the interface and offers free text search of SQL tables, columns, tags and saved queries. This is particularly useful for quickly looking up a table among thousands or finding existing queries already analyzing a certain dataset.
Existing tags, descriptions and indexed objects show up automatically, any additional tags you add appear back in metadata server, and the familiar metadata server search syntax is supported.
Searching all the available queries or data in the cluster
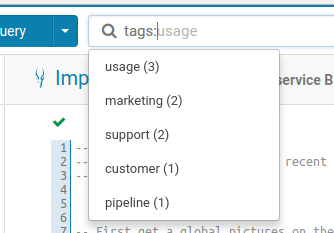
Listing the possible tags to filter on. This also works for ‘types’.
Unification of metadata
The list of tables and their columns is displayed in multiple part of the interface. This data is pretty costly to fetch and comes from different sources. In this new version, the information is now cached and reused by all the Hue components. As the sources are diverse, e.g. Apache Hive, Apache Atlas those are stored into a single object, so that it is easier and faster to display without caring about the underlying technical details.
In addition to editing the tags of any SQL objects like tables, views, columns… which has been available since version one, table descriptions can now also be edited. This allows a self service documentation of the metadata by the end users, which was not possible until now as directly editing Hive comments require some admin Sentry privileges which are not granted to regular users in a secure cluster.
Search
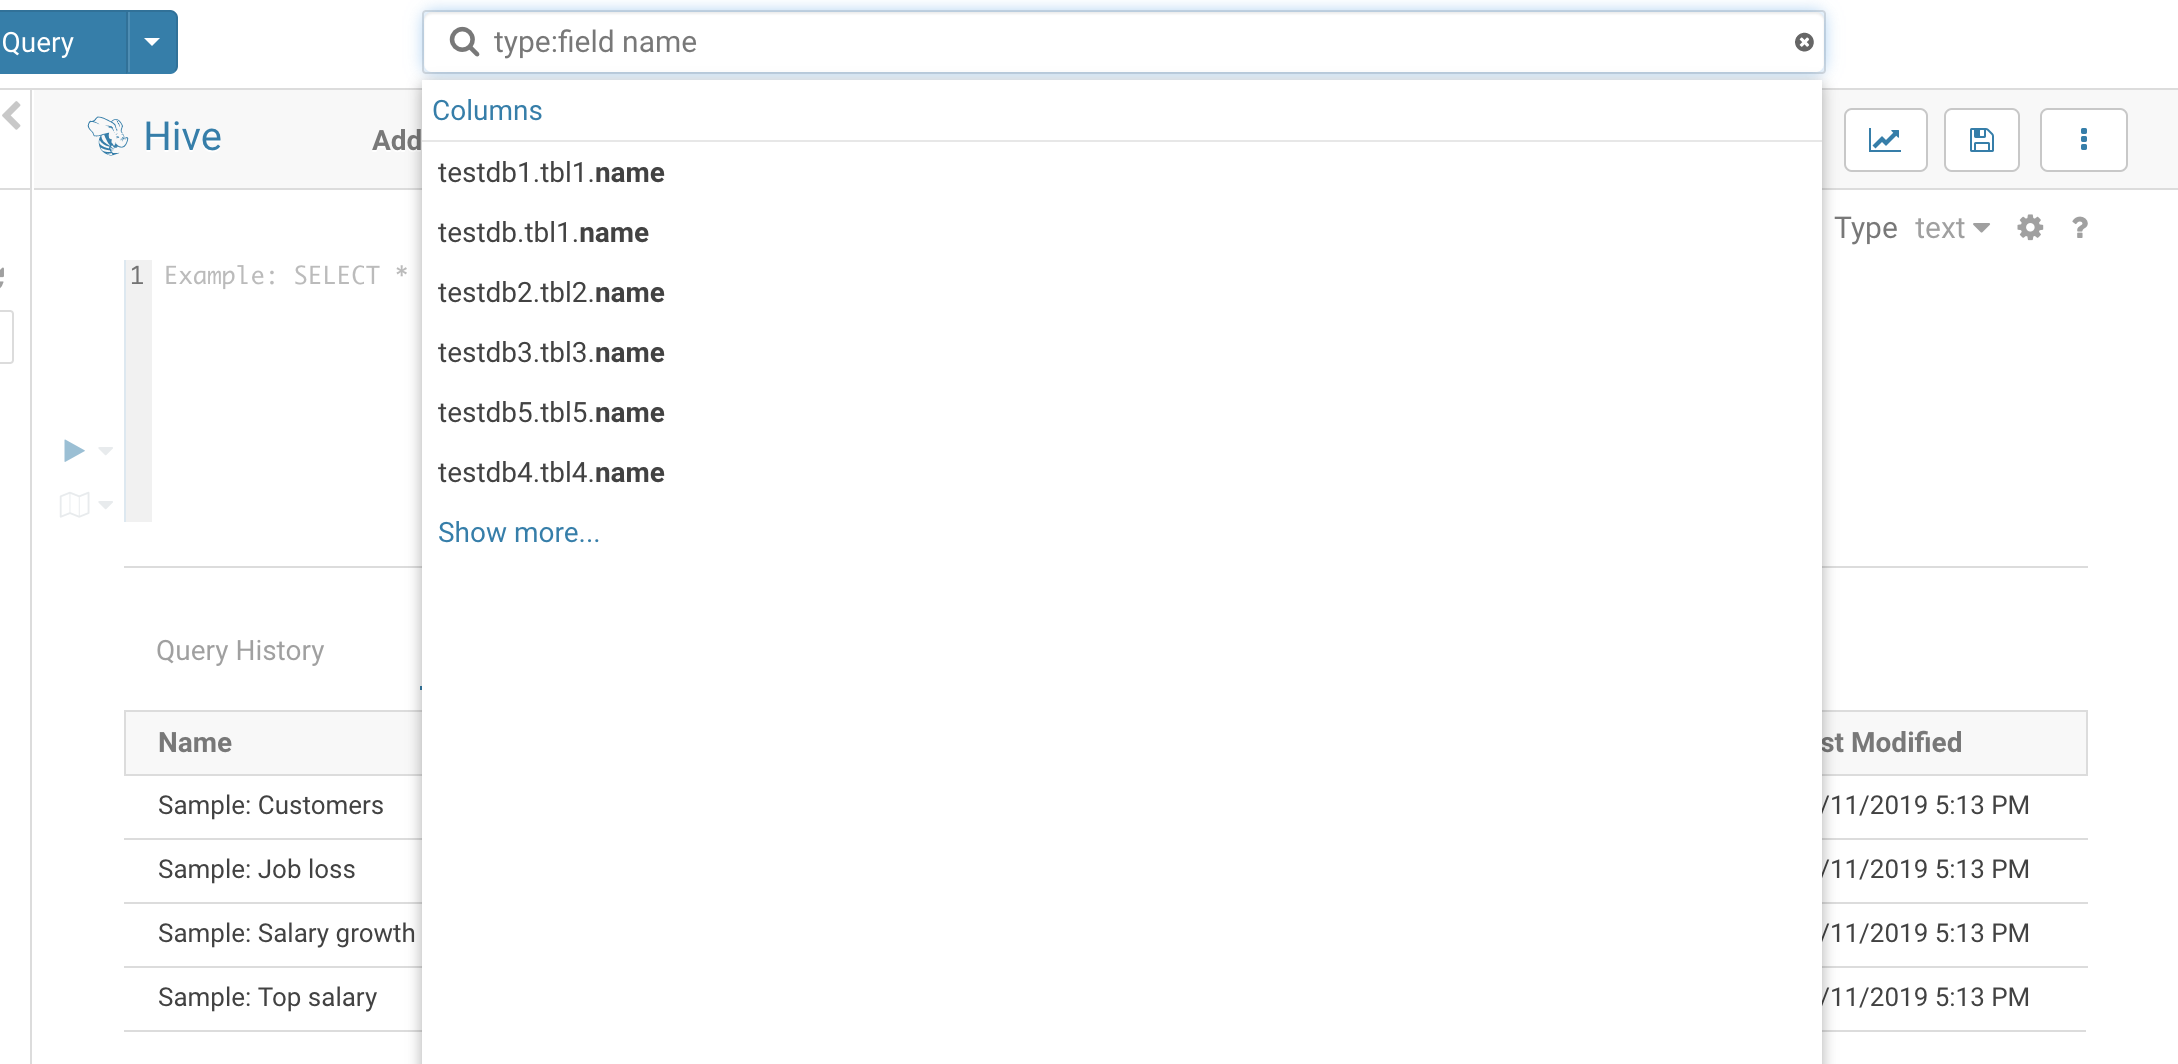
By default, only tables and views are returned. To search for columns, partitions, databases use the ‘type:’ filter.
Example of searches:
Atlas
- sample → Any table or Hue document with prefix ‘sample’ will be returned
- type:database → List all databases on this cluster
- type:table → List all tables on this cluster
- type:field name → List tables with field(column): ‘name’
- ‘tag:classification_testdb5’ or ‘classification:classification_testdb5’→ List entities with classification ‘classification_testdb5’
- owner:admin → List all tables owned by ‘admin’ user
Navigator
- table:customer → Find the customer table
- table:tax* tags:finance → List all the tables starting with tax and tagged with ‘finance’
- owner:admin type:field usage → List all the fields created by the admin user that matches the usage string
- parentPath:"/default/web_logs” type:FIELD originalName:b* → List all the columns starting with
bof the tableweb_logsin the databasedefault.
Learn more on the Search.
Tagging
In addition, you can also now tag objects with names to better categorize them and group them to different projects. These tags are searchable, expediting the exploration process through easier, more intuitive discovery.

Importing Data
The goal of the importer is to allow ad-hoc queries on data not yet in the clusters and simplifies self-service analytics.
If you want to import your own data instead of installing the sample
tables, open the importer from the left menu or from the little + in the left assist.
To learn more, watch the video on Data Import Wizard.
Note Files can be dragged & dropped, selected from HDFS or S3 (if configured), and their formats are automatically detected. The wizard also assists when performing advanced functionalities like table partitioning, Kudu tables, and nested types.
CSV file
Any small CSV file can be ingested into a new index in a few clicks.
Relational Databases
Import data from relational databases to HDFS file or Hive table using Apache Sqoop. It enables to bring large amount of data into the cluster in just few clicks via interactive UI. The imports run on YARN and are scheduled by Oozie.
Learn more about it on the ingesting data from traditional databases post.
Apache Solr
In the past, indexing data into Solr to then explore it with a Dynamic Dashboard has been quite difficult. The task involved writing a Solr schema and a Morphlines file then submitting a job to YARN to do the indexing. Often times getting this correct for non trivial imports could take a few days of work. Now with Hue's new feature you can start your YARN indexing job in minutes.
First you’ll need to have a running Solr cluster that Hue is configured with.
Next you’ll need to install these required libraries. To do so place them in a directory somewhere on HDFS and set the path for config_indexer_libs_path under indexer in the Hue ini to match by default, the config_indexer_libs_path value is set to /tmp/smart_indexer_lib. Additionally under indexer in the Hue ini you’ll need to set enable_new_indexer to true.
[indexer]

# Flag to turn on the morphline based Solr indexer.
enable_new_indexer=false

# Oozie workspace template for indexing.
## config_indexer_libs_path=/tmp/smart_indexer_lib
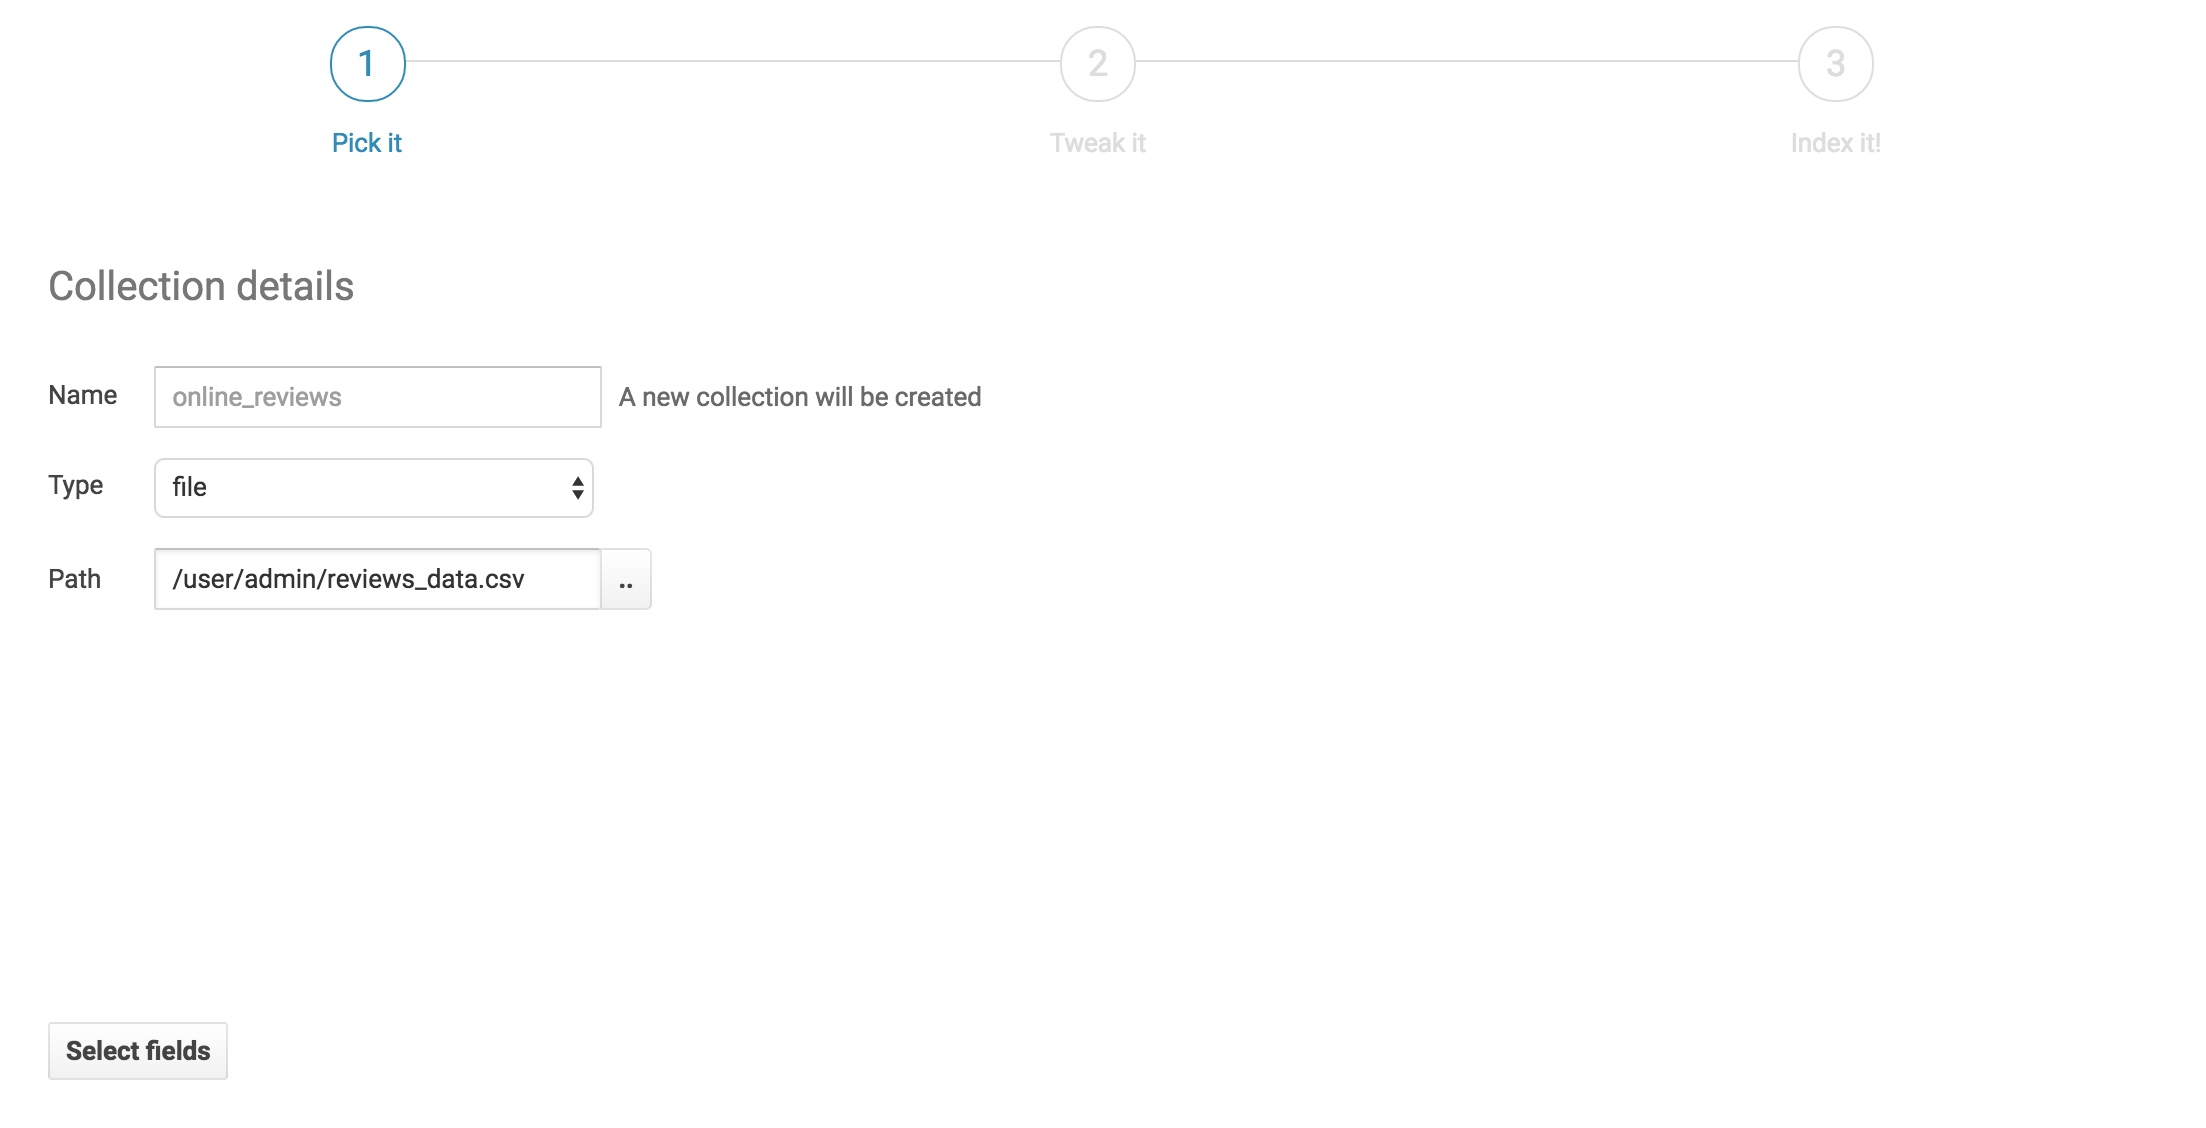
We’ll pick a name for our new collection and select our reviews data file from HDFS. Then we’ll click next.
Field selection and ETL
On this tab we can see all the fields the indexer has picked up from the file. Note that Hue has also made an educated guess on the field type. Generally, Hue does a good job inferring data type. However, we should do a quick check to confirm that the field types look correct.
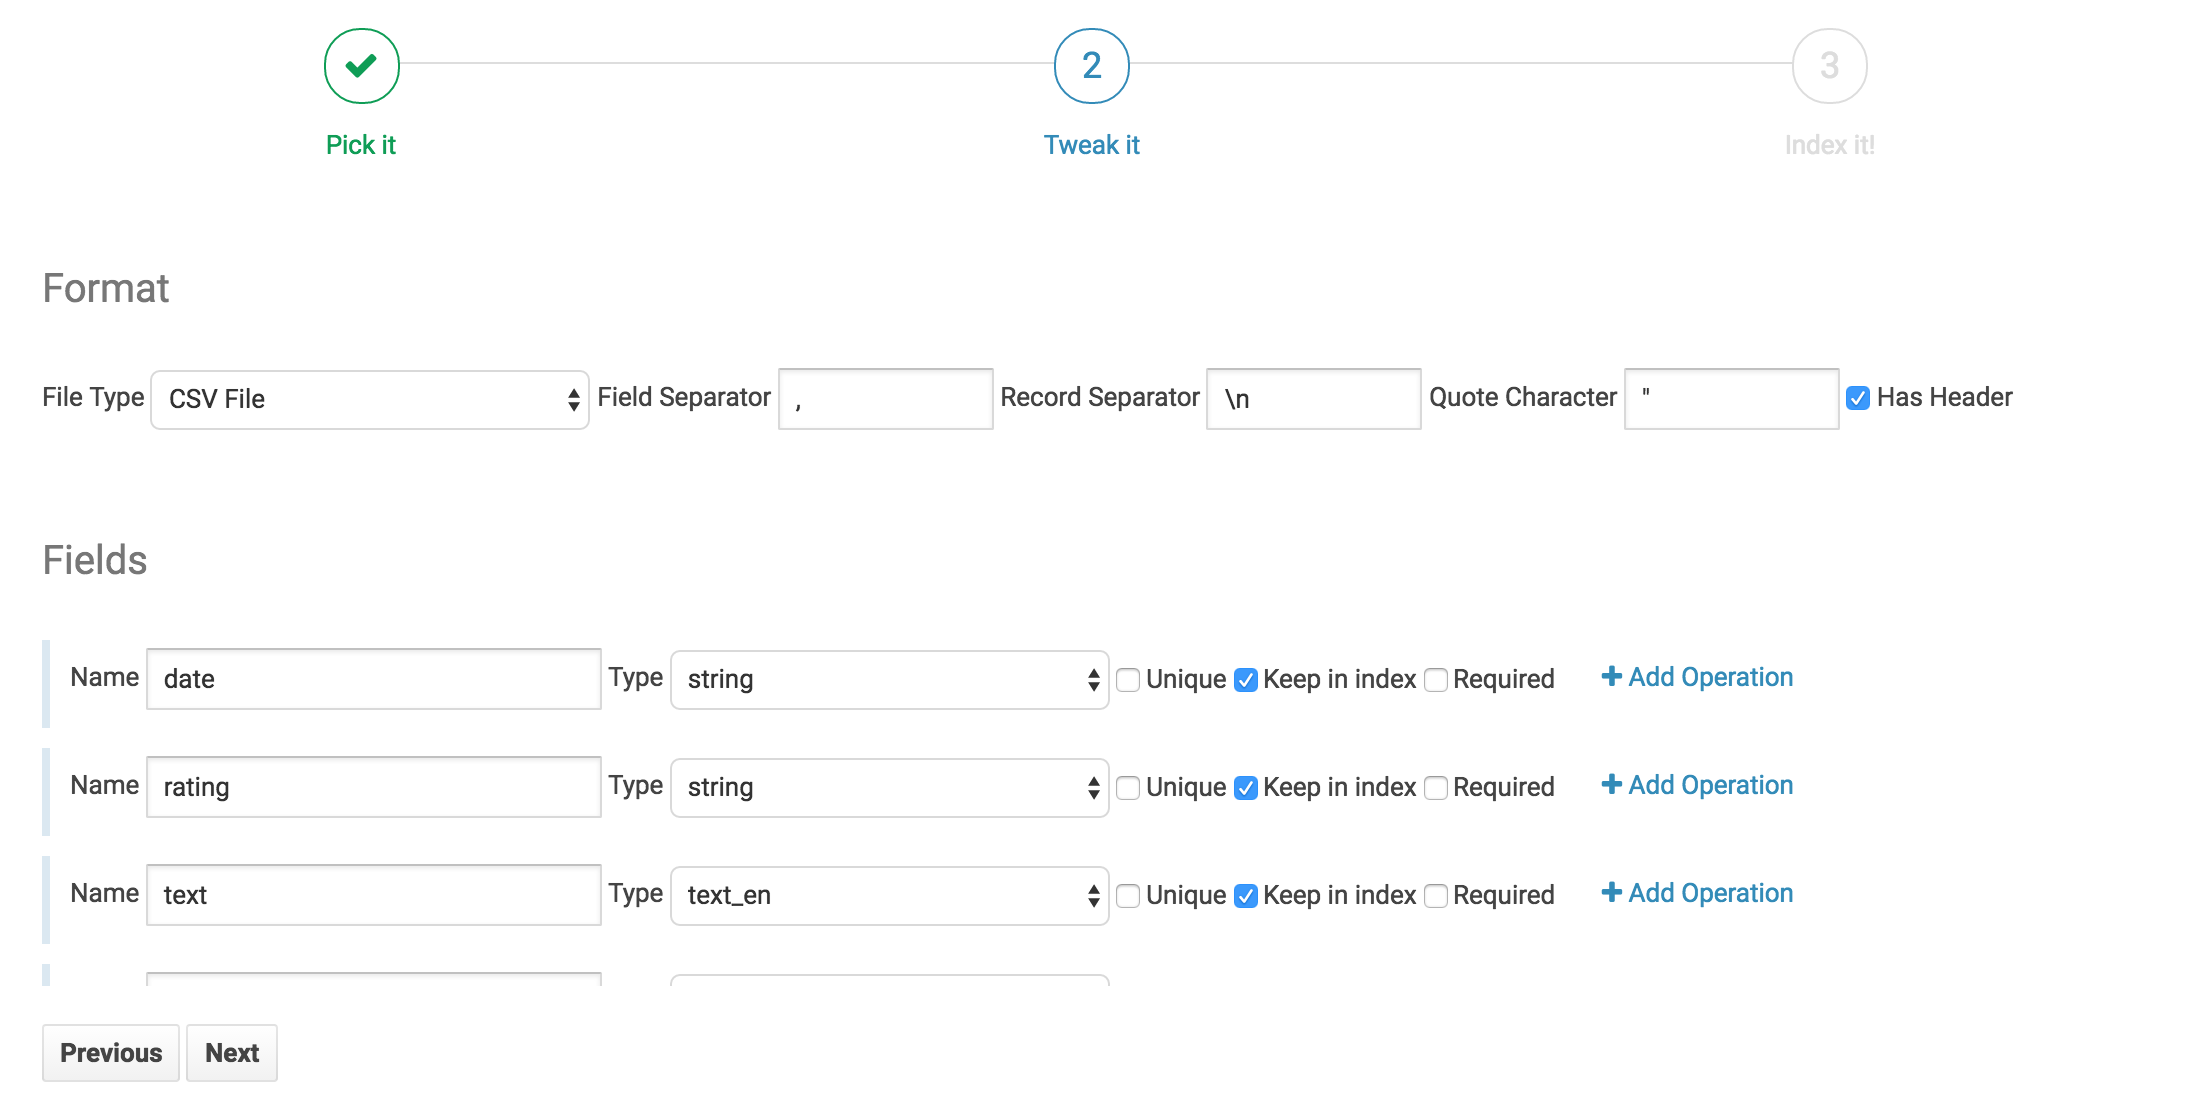
For our data we’re going to perform 4 operations to make a very searchable Solr Collection.
Convert Date
This operation is implicit. By setting the field type to date we inform Hue that we want to convert this date to a Solr Date. Hue can convert most standard date formats automatically. If we had a unique date format we would have to define it for Hue by explicitly using the convert date operation.

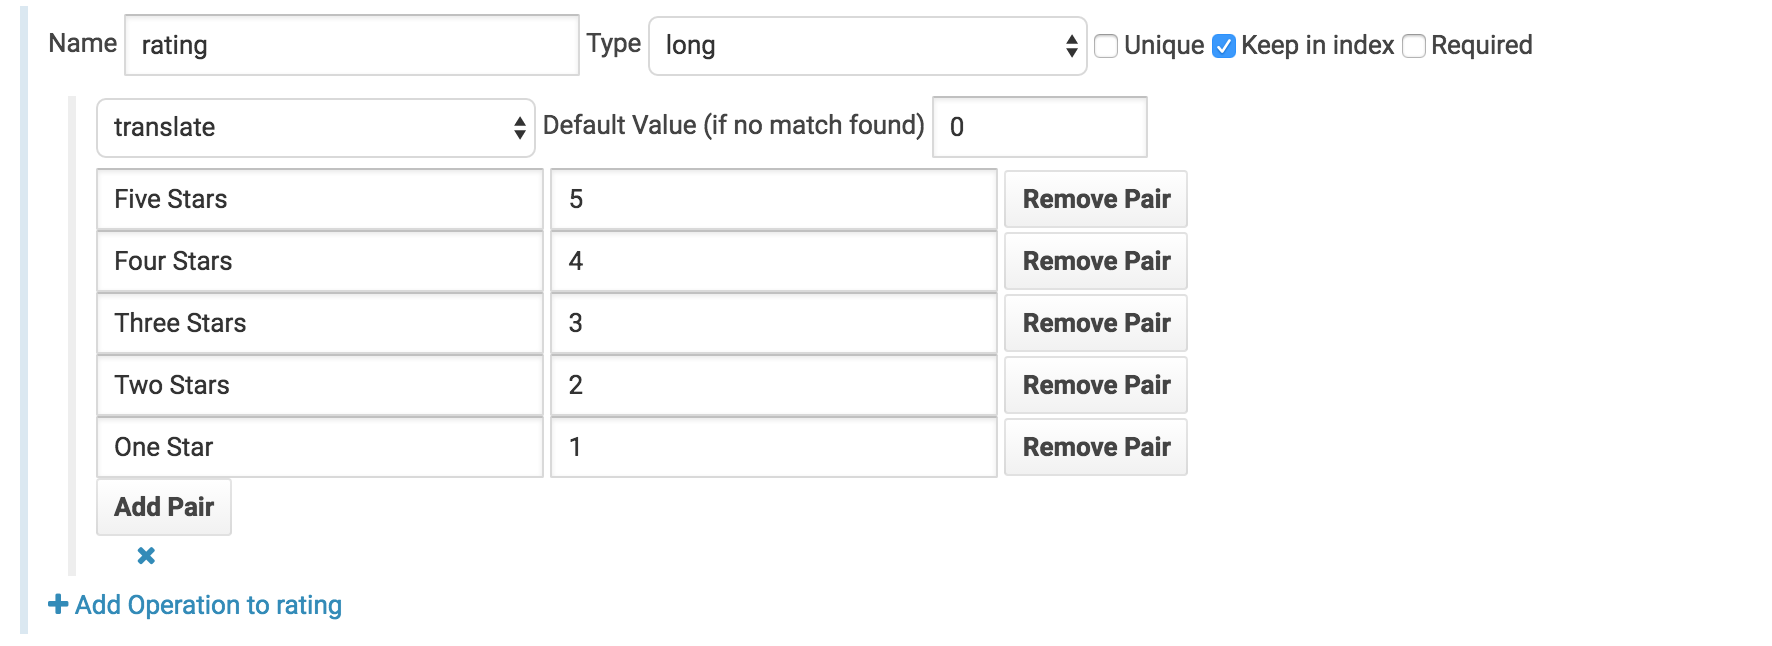
Translate star ratings to integer ratings
Under the rating field we’ll change the field type from string to long and click add operation. We’ll then select the translate operation and setup the following translation mapping.
Grok the city from the full address field
We’ll add a grok operation to the full address field, fill in the following regex .* (?\w+),.* and set the number of expected fields to

- In the new child field we’ll set the name to city. This new field will now contain the value matching the city capture group in the regex.
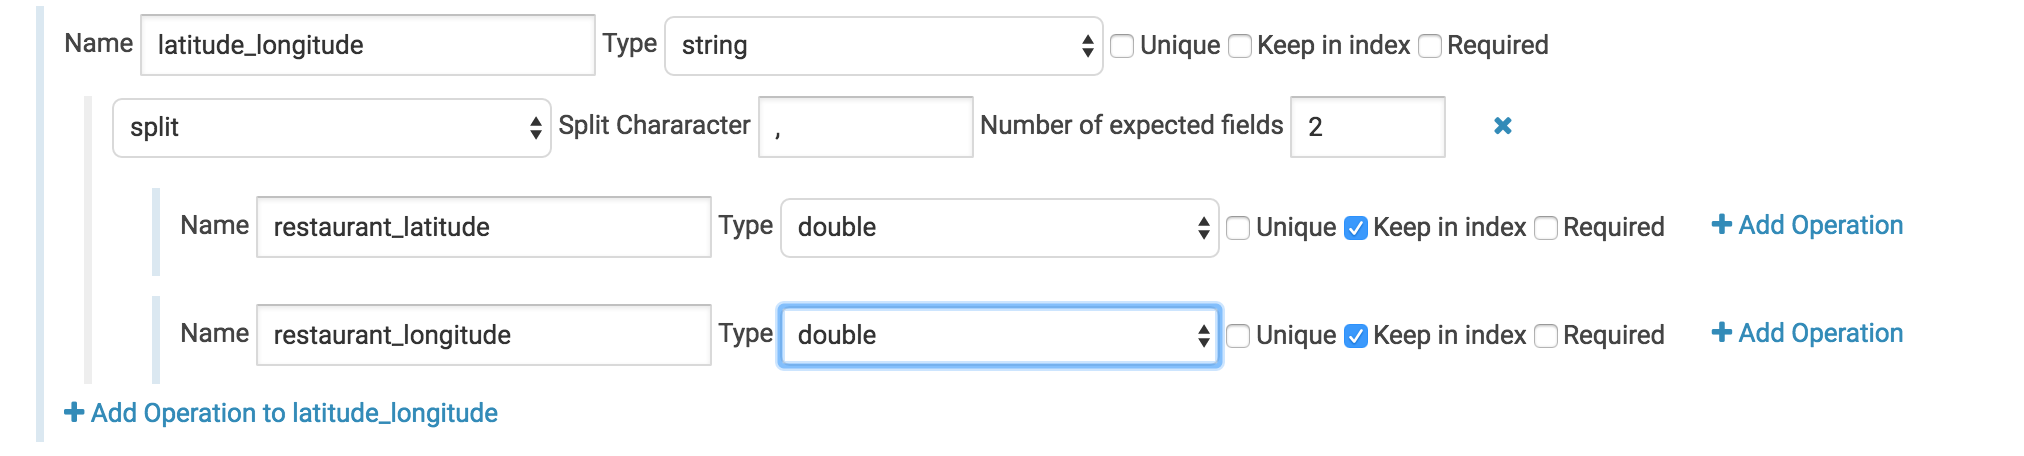
Use a split operation to separate the latitude/longitude field into two separate floating point fields. Here we have an annoyance. Our data file contains the latitude and longitude of the place that’s being reviewed – Awesome! For some reason though they’ve been clumped into one field with a comma between the two numbers. We’ll use a split operation to grab each individually. Set the split value to ‘,’ and the number of output fields to 2. Then change the child fields’ types to doubles and give them logical names. In this case there’s not really much sense in keeping the parent field so let’s uncheck the “keep in index” box.
Here we’ll add a geo ip operation and select iso_code as our output. This will give us the country code.

Before we index, let’s make sure everything looks good with a quick scan of the preview. This can be handy to avoid any silly typos or anything like that.
Now that we’ve defined our ETL Hue can do the rest. Click index and wait for Hue to index our data. At the bottom of this screen we can see a progress bar of the process. Yellow means our data is currently being indexed and green means it’s done. Feel free to close this window. The indexing will continue on your cluster.
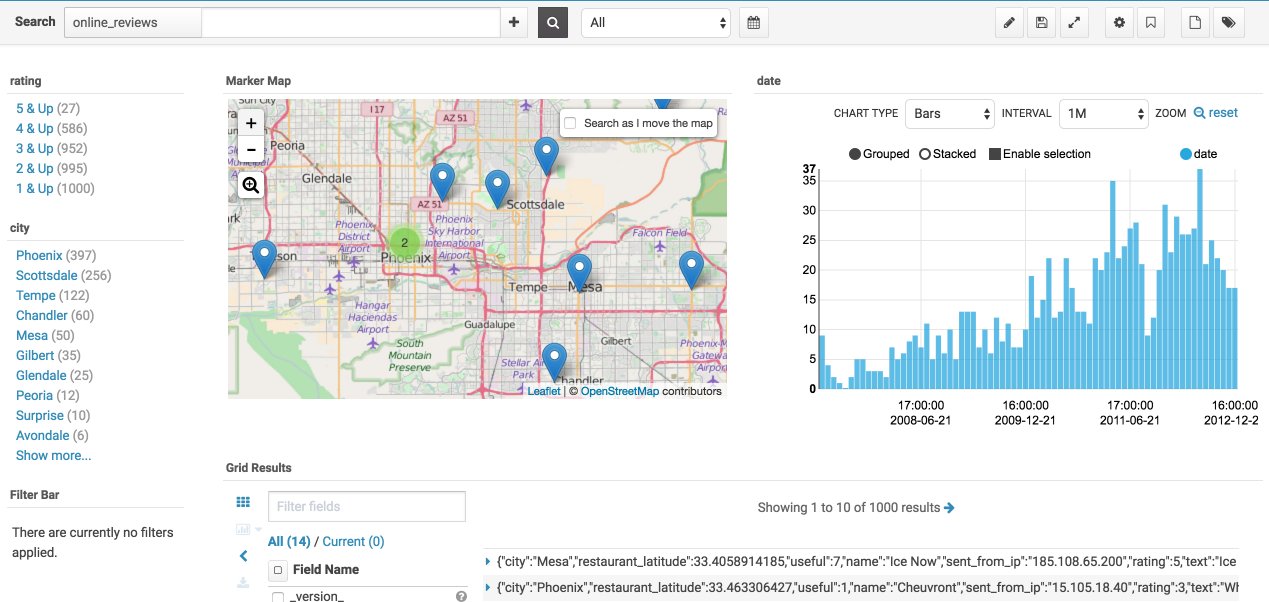
Once our data has been indexed into a Solr Collection we have access to all of Hue’s search features and can make a nice analytics dashboard like this one for our data.
Dependencies
The indexer libs path is where all required libraries for indexing should be. If you’d prefer you can assemble this directory yourself. There are three main components to the libs directory:
- JAR files required by the MapReduceIndexerTool
All required jar files should have shipped with CDH. Currently the list of required JARs is:
argparse4j-0.4.3.jar
readme.txt
httpmime-4.2.5.jar
search-mr-1.0.0-cdh5.8.0-job.jar
kite-morphlines-core-1.0.0-cdh5.8.0.jar
solr-core-4.10.3-cdh5.8.0.jar
kite-morphlines-solr-core-1.0.0-cdh5.8.0.jar
solr-solrj-4.10.3-cdh5.8.0.jar
noggit-0.5.jar
Should this change and you get a missing class error, you can find whatever jar may be missing by grepping all the jars packaged with CDH for the missing class.
- Maxmind GeoLite2 database
This file is required for the GeoIP lookup command and can be found on MaxMind’s website.
- Grok Dictionaries
Any grok commands can be defined in text files within the grok_dictionaries sub directory.
Streams
Kafka topics, Streams, Tables can be listed via the ksql connector.
Permissions
Sentry roles and privileges can directly be edited in the Security interface.
Note Apache Sentry is going to be replaced by Apache Ranger in HUE-8748.
Sentry Tables
It can be tricky to grant a new user proper permissions on a secure cluster, let’s walk through the steps to enable any new user for table creation on a kerberized cluster. Depends on your cluster size, creating user and group on each node can be tedious. Here we use pssh (Parallel ssh) for this task.
- Install the tool and prepare a file which contains all your hosts.
For Mac user:
brew install pssh
For Debian or Ubuntu user:
sudo apt-get install pssh

cat ~/Documents/nodeshue.txt
hue-1.test.cloudera.com
hue-2.test.cloudera.com
hue-3.test.cloudera.com
hue-4.test.cloudera.com
-
Run follow commands to create user: t1 and group: grp1 on your cluster:
pssh -h ~/Documents/nodeshue.txt -i useradd t1 [1] 13:58:48 [SUCCESS] hue-1.test.cloudera.com [2] 13:58:48 [SUCCESS] hue-2.test.cloudera.com [3] 13:58:48 [SUCCESS] hue-3.test.cloudera.com [4] 13:58:48 [SUCCESS] hue-4.test.cloudera.com pssh --hosts ~/Documents/nodes.txt -i groupadd grp1 [1] 13:59:20 [SUCCESS] hue-1.test.cloudera.com [2] 13:59:20 [SUCCESS] hue-2.test.cloudera.com [3] 13:59:20 [SUCCESS] hue-3.test.cloudera.com [4] 13:59:20 [SUCCESS] hue-4.test.cloudera.com pssh --hosts ~/Documents/nodes.txt -i usermod -a -G grp1 t1 [1] 13:59:28 [SUCCESS] hue-1.test.cloudera.com [2] 13:59:28 [SUCCESS] hue-2.test.cloudera.com [3] 13:59:28 [SUCCESS] hue-3.test.cloudera.com [4] 13:59:28 [SUCCESS] hue-4.test.cloudera.com -
Create same Hue user: t1 and group: grp1 and make “t1″a member of “grp1”.
-
Then log in as any user with sentry admin permission to run following queries in hive editor:
create role write_role;
GRANT ROLE write_role TO GROUP grp1;
GRANT ALL ON SERVER server1 TO ROLE write_role;
Now “t1” user or any user in “grp1” can log in and create table by running any hive/impala DDL queries or through Hue importer.
But mostly we would like to grant proper permissions for users instead of ALL on server. let’s walk through two other examples like read_only_role and read_write_role for specific databases.
Using similar commands to create t2 user in group grp2 and t3 user in group grp3 on cluster and Hue. Then use following statements to grant proper permission to each group:
-
Read write access to database: ‘s3db’ for any user in group ‘grp3’:
create role read_write_s3db_role; GRANT ROLE read_write_s3db_role TO GROUP grp3; GRANT ALL ON DATABASE s3db TO ROLE read_write_s3db_role; GRANT ALL ON URI 'hdfs://hue-1.test.cloudera.com:8020/user/t3' to ROLE read_write_s3db_role; -
Read only permission for database: ‘default’ for any user in group ‘grp2’:
create role read_only_defaultDb_role;
GRANT ROLE read_only_defaultDb_role TO GROUP grp2;
GRANT SELECT ON DATABASE default TO ROLE read_only_defaultDb_role;
GRANT REFRESH ON DATABASE default TO ROLE read_only_defaultDb_role;
Now ‘t3’ user can read and create new tables in database:s3db while ‘t2’ user can read database: default only.
We can grant those permission through Hue security page too, it should ends like following.

Note: You have to grant URI permission to avoid following error during table creation:
Error while compiling statement: FAILED: SemanticException No valid privileges User t3 does not have privileges for CREATETABLE The required privileges: Server=server1->URI=hdfs://hue-1.gce.cloudera.com:8020/user/t3/t3_dir->action=*->grantOption=false;
Sentry Solr
Apache Solr privileges can be edited directly via the interface.
For listing collections, query and creating collection:
Admin=*->action=*
Collection=*->action=*
Schema=*->action=*
Config=*->action=*
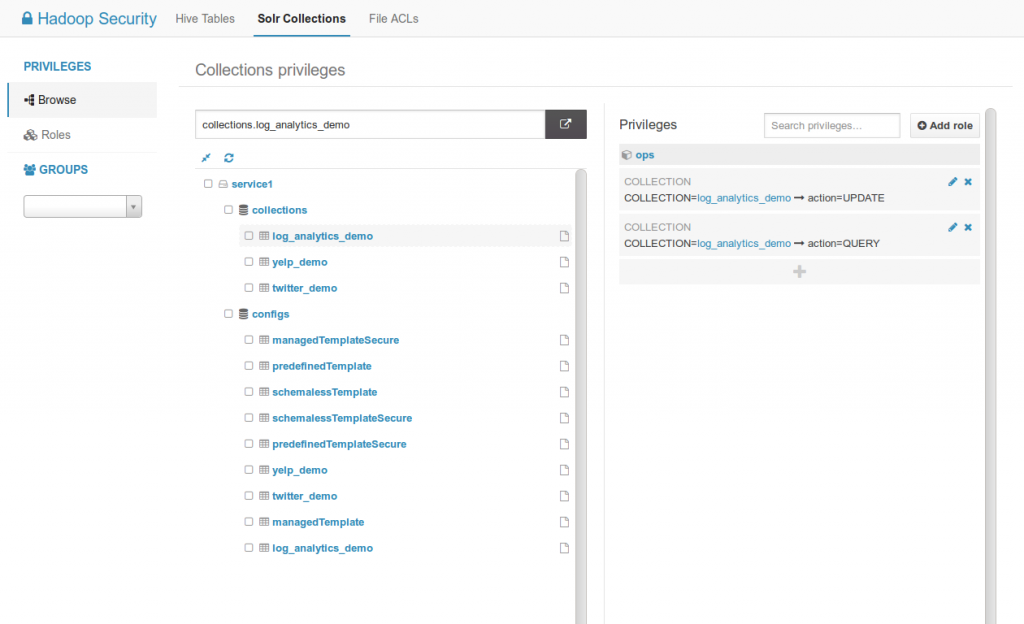 Listing of Solr collections and configs with their related privileges.
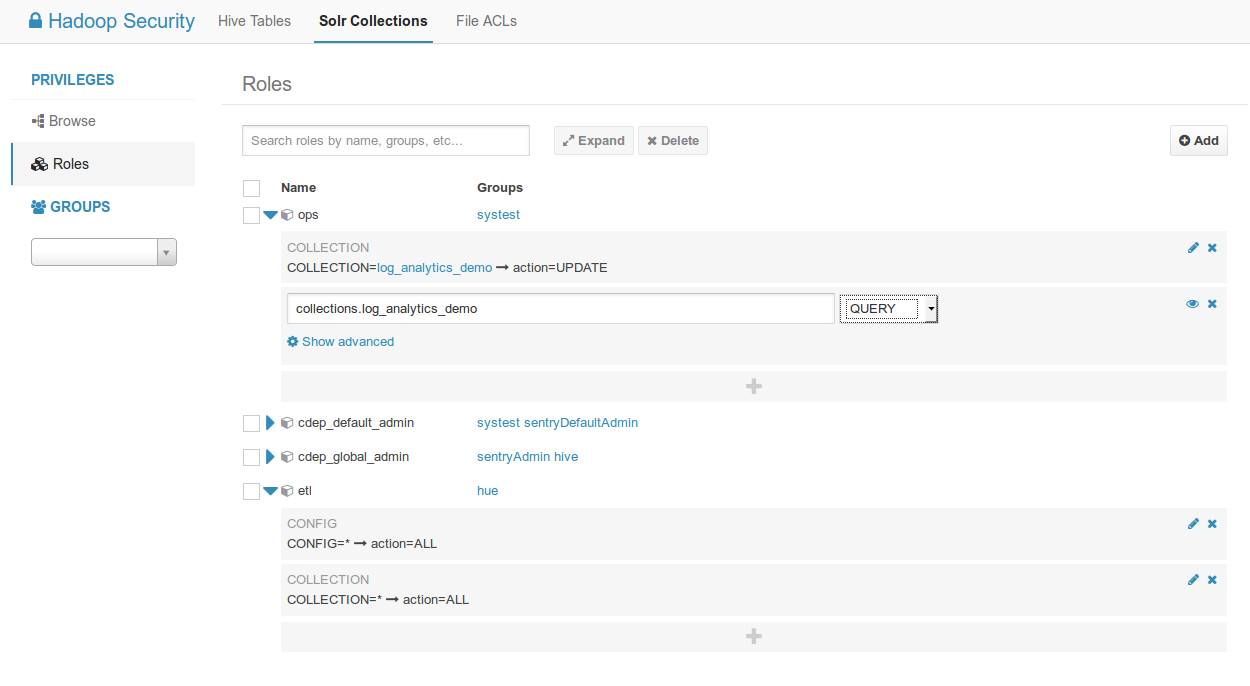 Listing of all the roles and their privileges. Possibility to filter by groups.
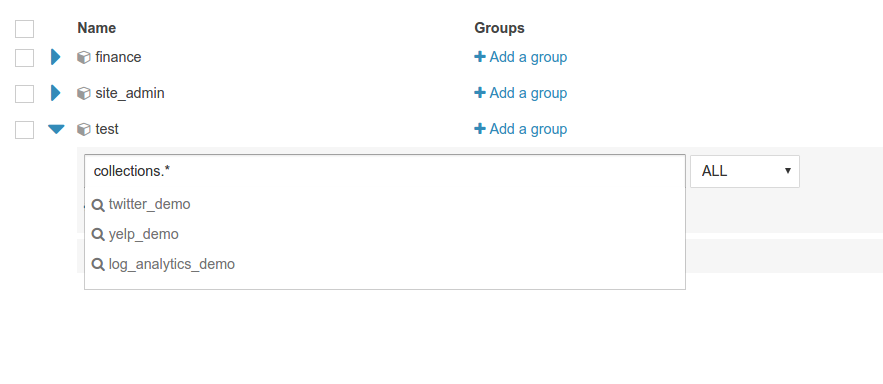 Apply privilege to all the collections or configs with *
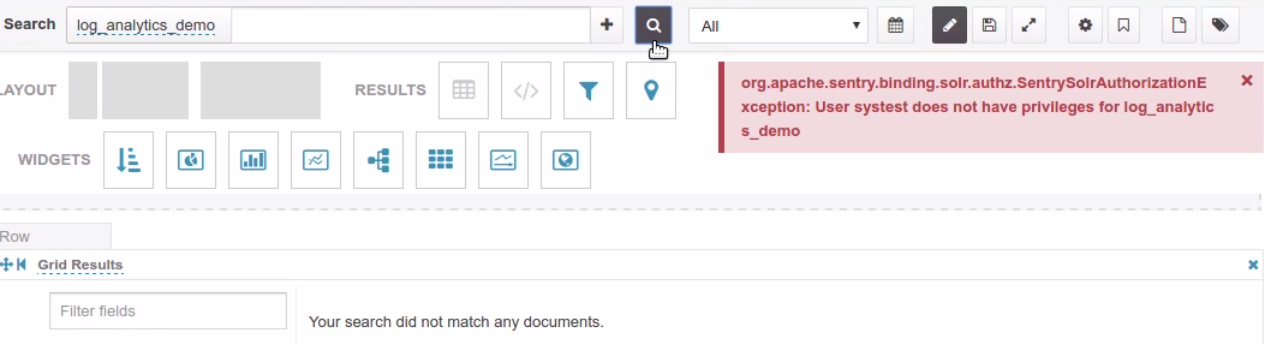 End user error when querying a collection without the QUERY privilege
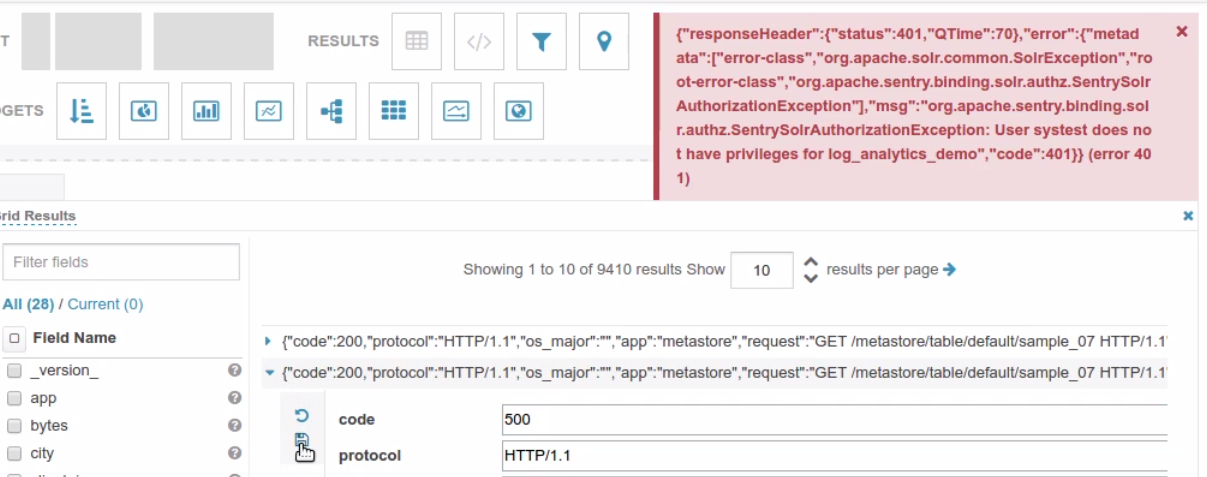 End user error when modifying a record without the UPDATE privilege
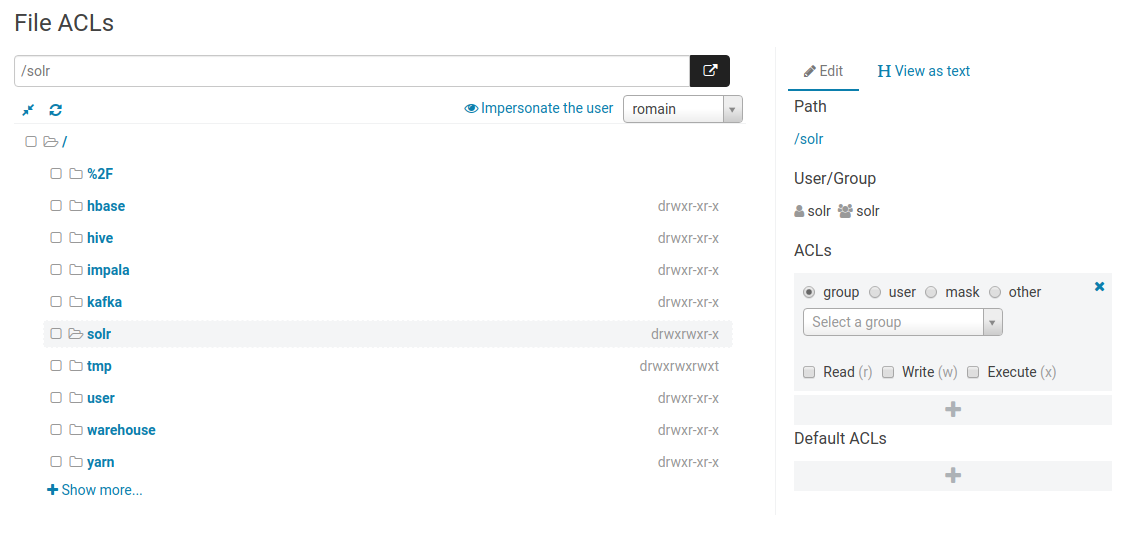
HDFS Acls
Editing HDFS acls in the Security app:
Data
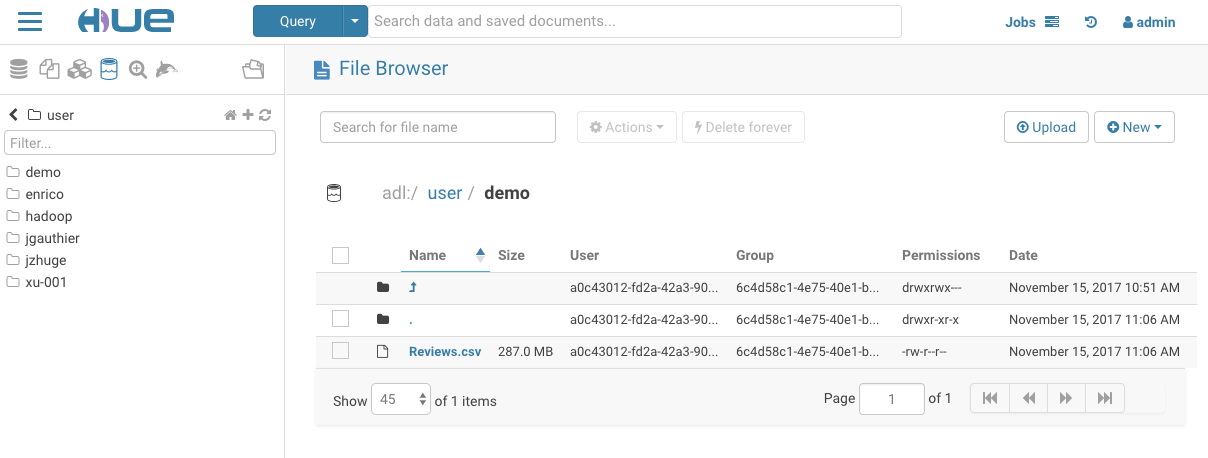
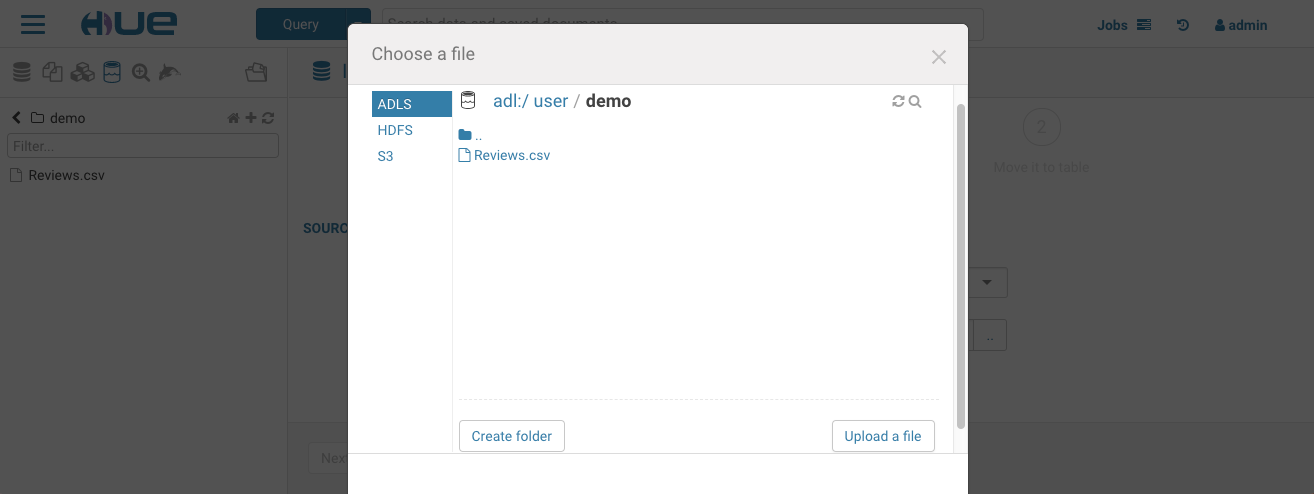
The File Browser application lets you interact with these file systems HDFS, S3 or ADLS:
- Create files and directories, upload and download files, upload zip archives and extract them, rename, move, and delete files and directories.
- Change a file's or directory's owner, group, and permissions.
- View and edit files as text or binary.
- Create external tables or export query results
Exploring in File Browser
Once Hue is successfully configured to connect to the storage, we can view all accessible folders within the account by clicking on the storage root. From here, we can view the existing keys (both directories and files) and create, rename, move, copy, or delete existing directories and files. Additionally, we can directly upload files to the storage.
Creating SQL Tables
Hue’s table browser import wizard can create external Hive tables directly from files in the storage. This allows the data to be queried via SQL, without moving or copying the data into HDFS or the Hive Warehouse. To create an external table from the storage, navigate to the table browser, select the desired database and then click the plus icon in the upper right. Select a file using the file picker and browse to a file on the storage.
Choose your input files’ delimiter and press next. Keep unchecked “Store in Default location” if you want the file to stay intact on the storage, update the column definition options and finally click “Submit” when you’re ready to create the table. Once created, you should see the newly created table details in the table browser.
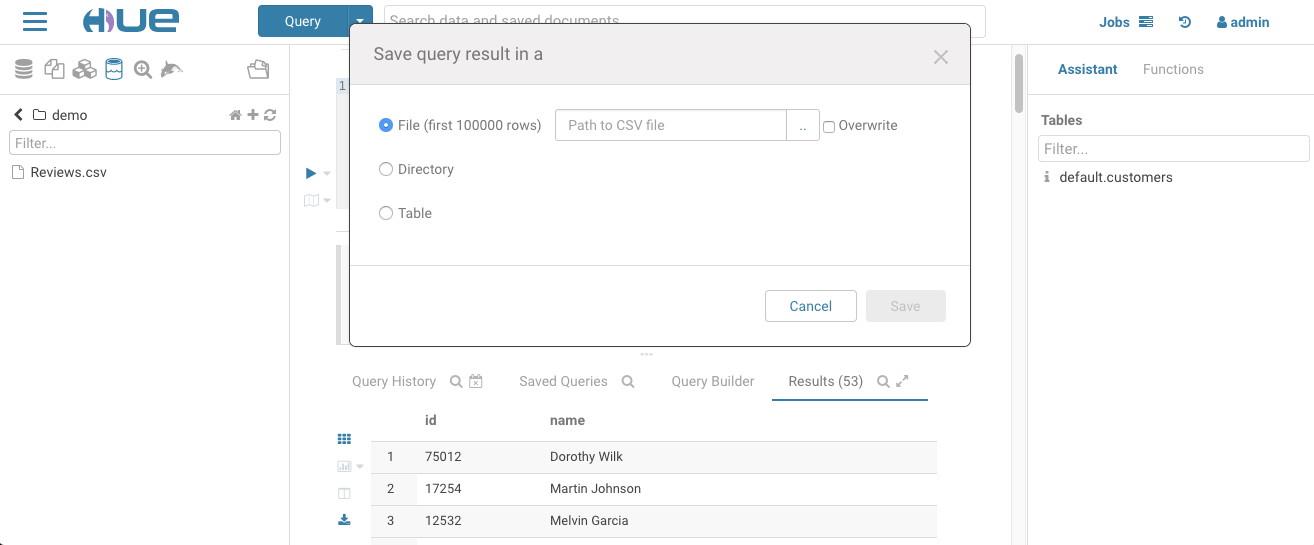
Saving Query Results
Now that we have created external Hive tables created from our data, we can jump into either the Hive or Impala editor and start querying the data directly from the storage seamlessly. These queries can join tables. Query results can then easily be saved back to the storage.
HDFS
Hue is fully compatible with HDFS and is handy for browsing, peeking at file content, upload or downloading data.
AWS S3
Hue can be setup to read and write to a configured S3 account, and users get autocomplete capabilities and can directly query from and save data to S3 without any intermediate moving/copying to HDFS.
Azure
ADLS v1 as well as ABFS (ADLS v2) are supported.
GCS
Google Cloud Storage is currently a work in progress HUE-8978
Streams
Kafka
Topics, Streams can be listed via the ksql connector.
HBase
Smart View
The smartview is the view that you land on when you first enter a table. On the left hand side are the row keys and hovering over a row reveals a list of controls on the right. Click a row to select it, and once selected you can perform batch operations, sort columns, or do any amount of standard database operations. To explore a row, simple scroll to the right. By scrolling, the row should continue to lazily-load cells until the end.
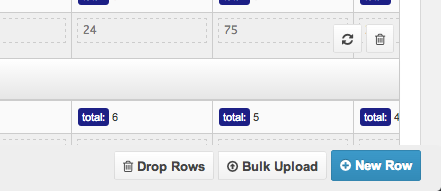
Adding Data
To initially populate the table, you can insert a new row or bulk upload CSV/TSV/etc. type data into your table.
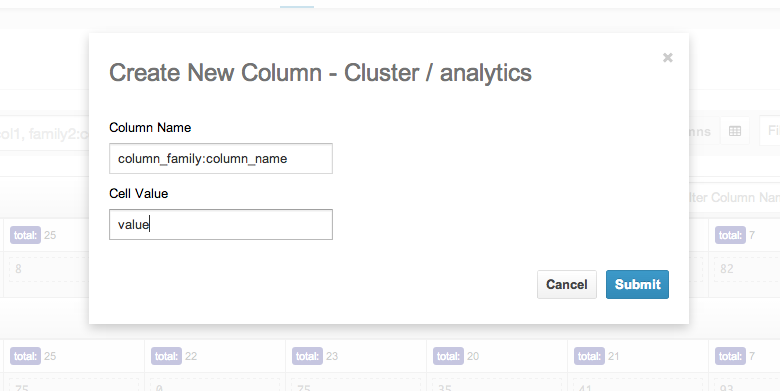
On the right hand side of a row is a ‘+’ sign that lets you insert columns into your row.
Mutating Data
To edit a cell, simply click to edit inline.
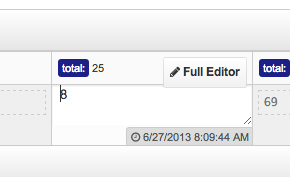
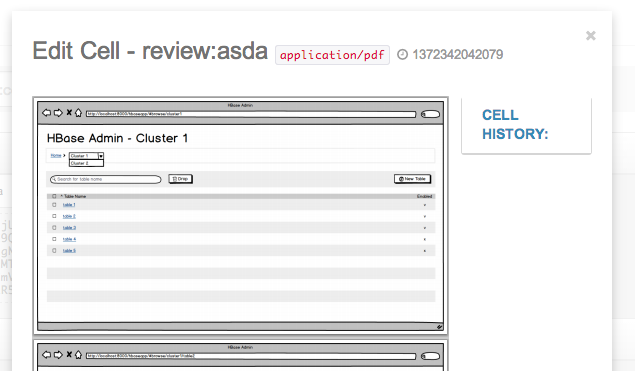
If you need more control or data about your cell, click “Full Editor” to edit.
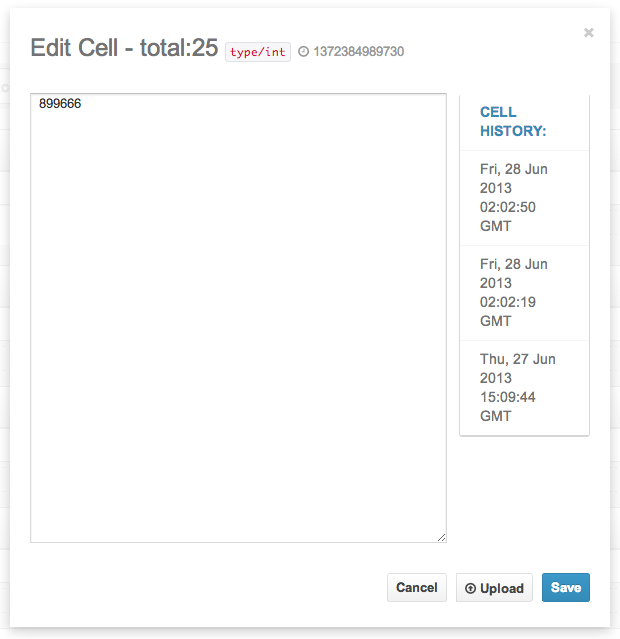
In the full editor, you can view cell history or upload binary data to the cell. Binary data of certain MIME Types are detected, meaning you can view and edit images, PDFs, JSON, XML, and other types directly in your browser!
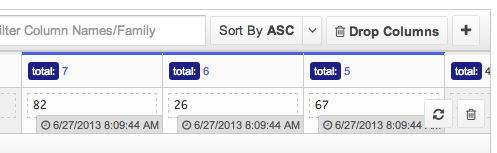
Hovering over a cell also reveals some more controls (such as the delete button or the timestamp). Click the title to select a few and do batch operations:
Smart Searchbar
The “Smart Searchbar” is a sophisticated tool that helps you zero-in on your data. The smart search supports a number of operations. The most basic ones include finding and scanning row keys. Here I am selecting two row keys with:
domain.100, domain.200
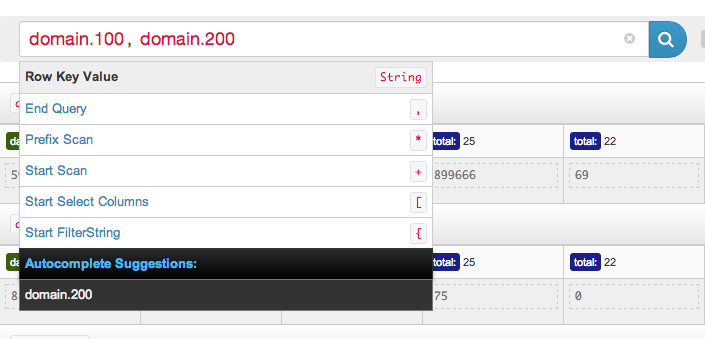
Submitting this query gives me the two rows I was looking for. If I want to fetch rows after one of these, I have to do a scan. This is as easy as writing a ‘+’ followed by the number of rows you want to fetch.
domain.100, domain.200 +5
Fetches domain.100 and domain.200 followed by the next 5 rows. If you're ever confused about your results, you can look down below and the query bar and also click in to edit your query.
The Smart Search also supports column filtering. On any row, I can specify the specific columns or families I want to retrieve. With:
domain.100[column_family:]
I can select a bare family, or mix columns from different families like so:
domain.100[family1:, family2:, family3:column_a]
Doing this will restrict my results from one row key to the columns I specified. If you want to restrict column families only, the same effect can be achieved with the filters on the right. Just click to toggle a filter.
Finally, let's try some more complex column filters. I can query for bare columns:
domain.100[column_a]
This will multiply my query over all column families. I can also do prefixes and scans:
domain.100[family: prefix* +3]
This will fetch me all columns that start with prefix* limited to 3 results. Finally, I can filter on range:
domain.100[family: column1 to column100]
This will fetch me all columns in ‘family:’ that are lexicographically >= column1 but <= column100. The first column (‘column1’) must be a valid column, but the second can just be any string for comparison.
The Smart Search also supports prefix filtering on rows. To select a prefixed row, simply type the row key followed by a star *. The prefix should be highlighted like any other searchbar keyword. A prefix scan is performed exactly like a regular scan, but with a prefixed row.
domain.10* +10
Finally, as a new feature, you can also take full advantage of the HBase filteringlanguage, by typing your filter string between curly braces. HBase Browser autocompletes your filters for you so you don't have to look them up every time. You can apply filters to rows or scans.
domain.1000 {ColumnPrefixFilter('100-') AND ColumnCountGetFilter(3)}
This doc only covers a few basic features of the Smart Search. You can take advantage of the full querying language by referring to the help menu when using the app. These include column prefix, bare columns, column range, etc. Remember that if you ever need help with the searchbar, you can use the help menu that pops up while typing, which will suggest next steps to complete your query.
Indexes
Apache Solr indexes can be created via the importer and are listed in the interface.
Jobs
The Job Browser application lets you to examine multiple types of jobs jobs running in the cluster. Job Browser presents the job and tasks in layers for quick access to the logs and troubleshooting.
SQL Queries
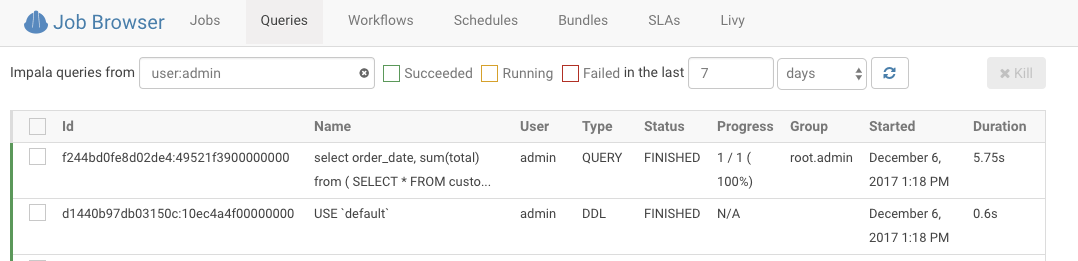
There are three ways to access the Query browser:
- Best: Click on the query ID after executing a SQL query in the editor. This will open the mini job browser overlay at the current query. Having the query execution information side by side the SQL editor is especially helpful to understand the performance characteristics of your queries.
- Open the mini job browser overlay and navigate to the queries tab.
- Open the job browser and navigate to the queries tab.
There are three ways to access the new browser:
Best: Click on the query ID after executing a SQL query in the editor. This will open the mini job browser overlay at the current query. Having the query execution information side by side the SQL editor is especially helpful to understand the performance characteristics of your queries. Open the mini job browser overlay and navigate to the queries tab. Open the job browser and navigate to the queries tab.
Query capabilities
Display the list of currently running queries on the user’s current Impala coordinator and a certain number of completed queries based on your configuration (25 by default).
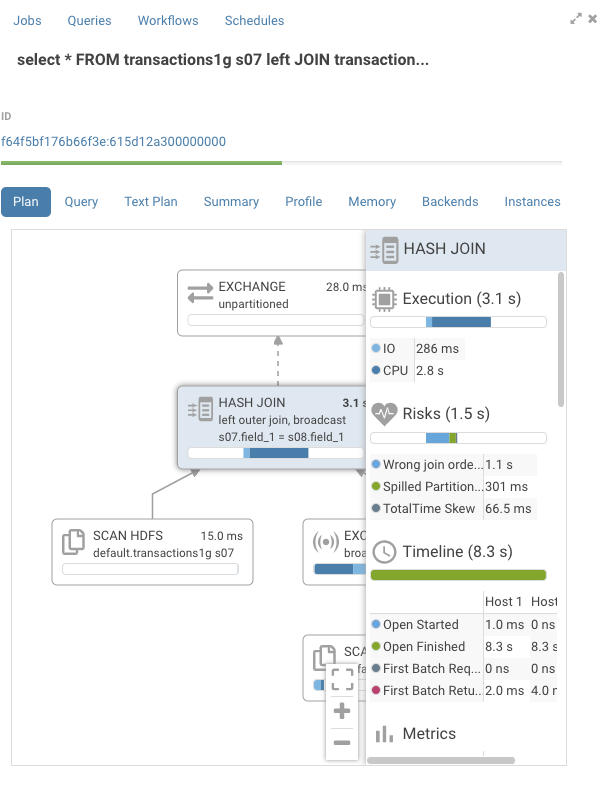
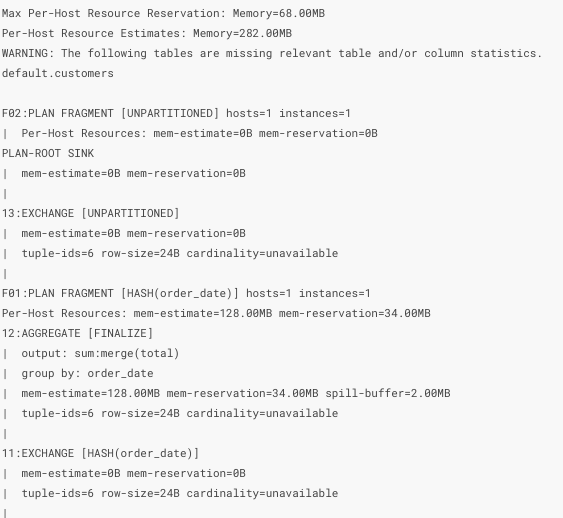
Display the explain plan which outlines logical execution steps. You can verify here that the execution will not proceed in an unexpected way (i.e. wrong join type, join order, projection order). This can happen if the statistics for the table are out of date as shown in the image below by the mention of “cardinality: unavailable”. You can obtain statistics by running:
COMPUTE STATS <TABLE_NAME>
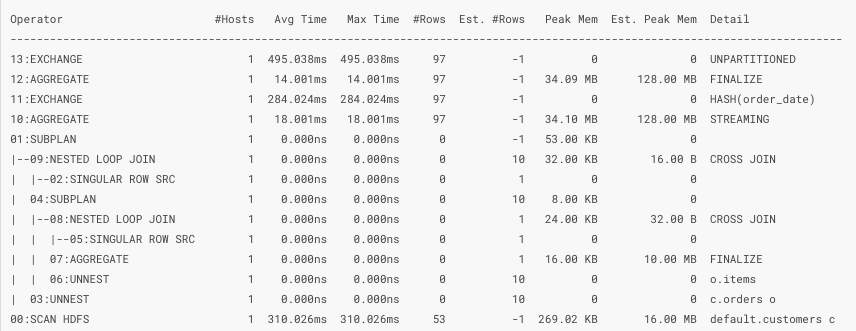
Display the summary report which shows physical timing and memory information of each operation of the explain plan. You can quickly find bottlenecks in the execution of the query which you can resolve by replacing expensive operations, repartitioning, changing file format or moving data.
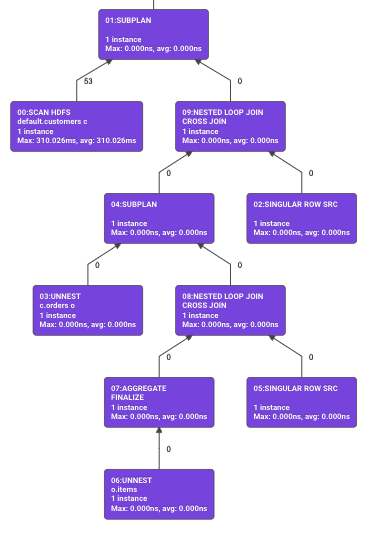
Display the query plan which is a condensed version of the summary report in graphical form.
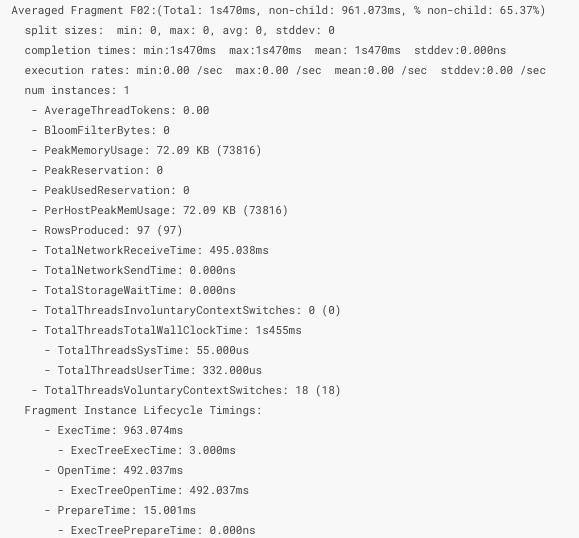
Display the memory profile which contains information about the memory usage during the execution of the query. You can use this to determine if the memory available to your query is sufficient.

Display the profile which gives you physical execution of the query in great detail. This view is used to analyze data exchange between the various operator and the performance of the IO (disk, network, CPU). You can use this to reorganize the location of your data (on disk, in memory, different partitions or file formats).
Manually close an opened query.
YARN (Spark, MapReduce, Tez)
Any job running on the Resource Manager will be automatically listed. The information will be fetched accordingly if the job got moved to one of the history servers.
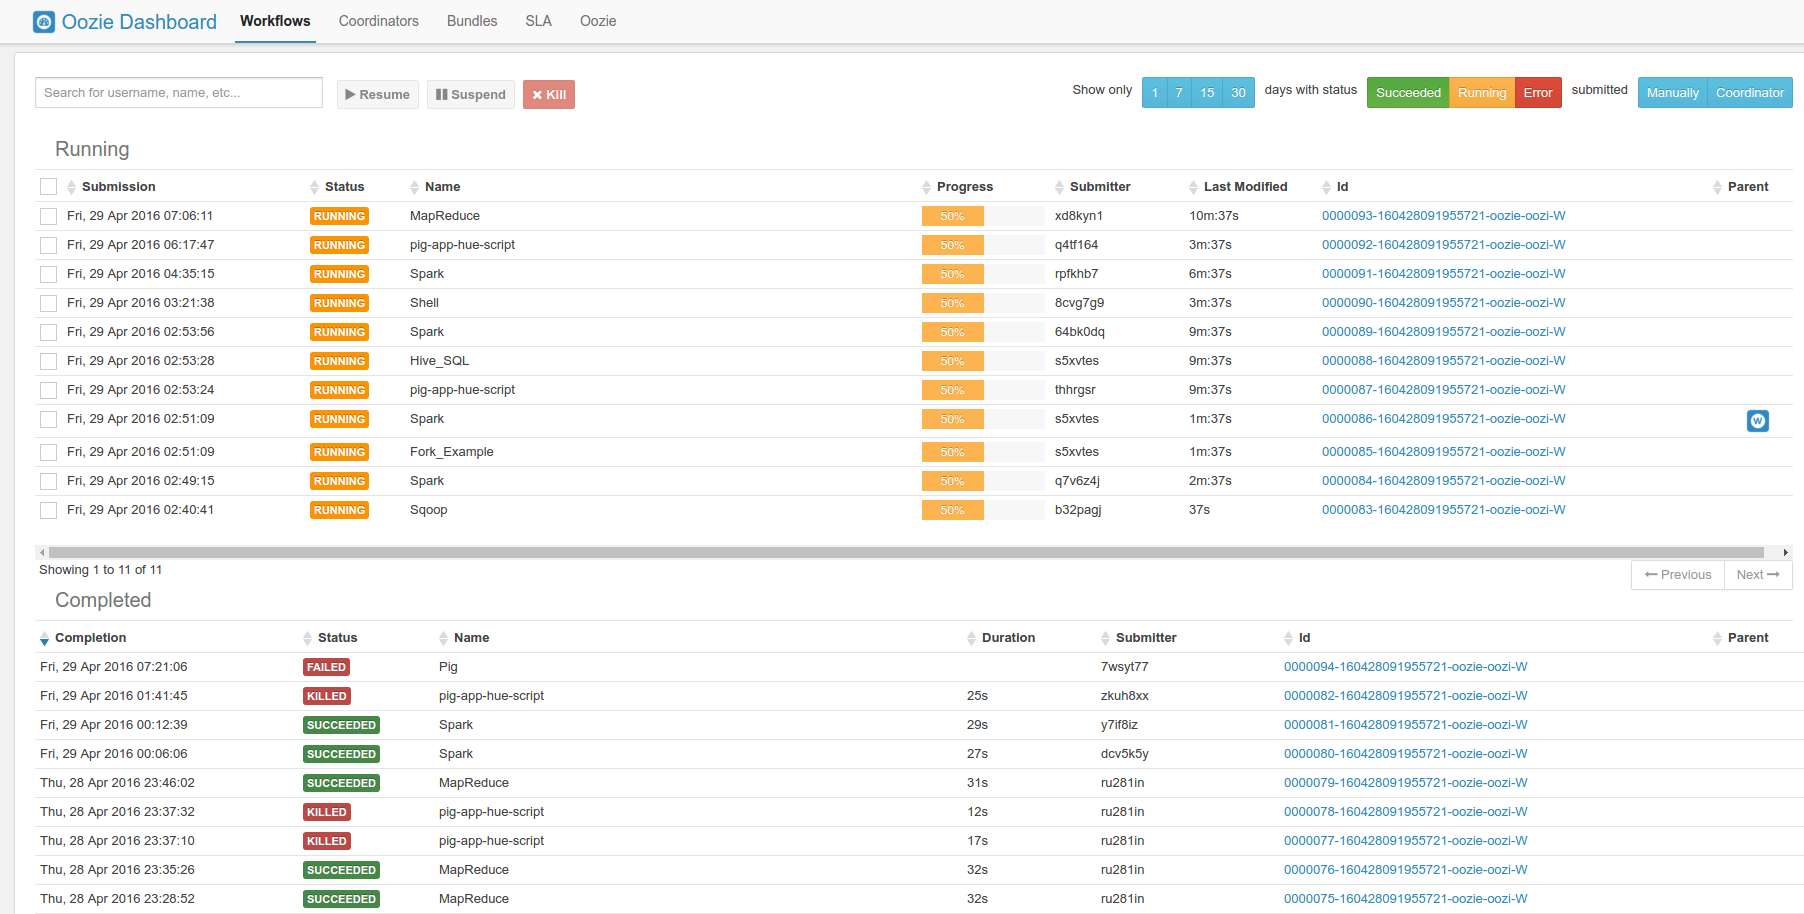
Oozie Workflow / Schedules
List submitted workflows, schedules and bundles.
Spark / Livy
List Spark Livy sessions and submitted statements.