Development
This section goes into greater detail on how to build and reuse the components of Hue.
Quick Start
Dependencies
- The OS specific packages are listed in the install guide
- Python 3.8/3.9 and Django 3.2
- Vue.js 3
- Node.js (20.0+)
Build & Start
Build once:
# If you are using Python 3.8, set PYTHON_VER before the build, like
export PYTHON_VER=python3.8

# Mac user might need to set
export SKIP_PYTHONDEV_CHECK=true

# Export ROOT which should point to your Hue directory
export ROOT=<path_to_hue_directory>

make apps
The dependencies documentation is here to help for troubleshooting build issues.
Then start the dev server (which will auto reload on file changes):
./build/env/bin/hue runserver
If you are changing JavaScript or CSS files, also start:
npm run dev
Persistence: Hue needs an existing database with transactions like MySQL to support concurrent requests and also not lose the registered users, saved queries, sharing permissions… when the server gets stopped.
Once build, in order to avoid the database is locked errors, you also need to connect Hue to a transactional database. It is recommended to use MySQL or PostGreSQL for development.
Open the desktop/conf/pseudo-distributed.ini file in a text editor. Add the following options (and modify accordingly) for your MySQL setup:
Directly below the [[database]] line, add the following.
host=localhost
port=3306
engine=mysql
user=hue
password=secretpassword
name=hue
Read more about how configurations work.
First SQL queries!
Here is how to point the Editor to either MySql or Apache Hive and execute your first SQL queries. For other supported databases refer to the connectors.
MySQL
In desktop/conf/pseudo-distributed.ini, below the [[interpreters]] section of of [notebook].
[[[mysql]]]
name=MySQL
interface=sqlalchemy
options='{"url": "mysql://${USER}:${PASSWORD}@localhost:3306/hue"}'
Apache Hive
You can connect to an existing Hive instance or setup a new one locally. An easy way to setup one is with Docker. You could use this Hive 2 container.
git clone https://github.com/big-data-europe/docker-hive
cd docker-hive
docker-compose up -d
Just follow the above 3 steps and you would have a running Hive instance on jdbc:hive2://localhost:10000.
Now under Hue open desktop/conf/pseudo-distributed.ini file in a text editor, and modify the following properties:
-
Directly below the
[[beeswax]]line, add the following:# Host where HiveServer2 is running. hive_server_host=localhost # Port where HiveServer2 Thrift server runs on. hive_server_port=10000 thrift_version=7 -
Below the
[[interpreters]]of[notebook], add:[[[hive]]] name=Hive interface=hiveserver2
And restart Hue, open the Editors and start typing your first queries!
Dev environment
Lint configs
For checking git commit message format automatically locally:
cp tools/githooks/* .git/hooks
chmod +x .git/hooks/*
Visual Studio Code
Add the ‘hue’ directory as a workspace, then install the following extensions:
Recommended extensions:
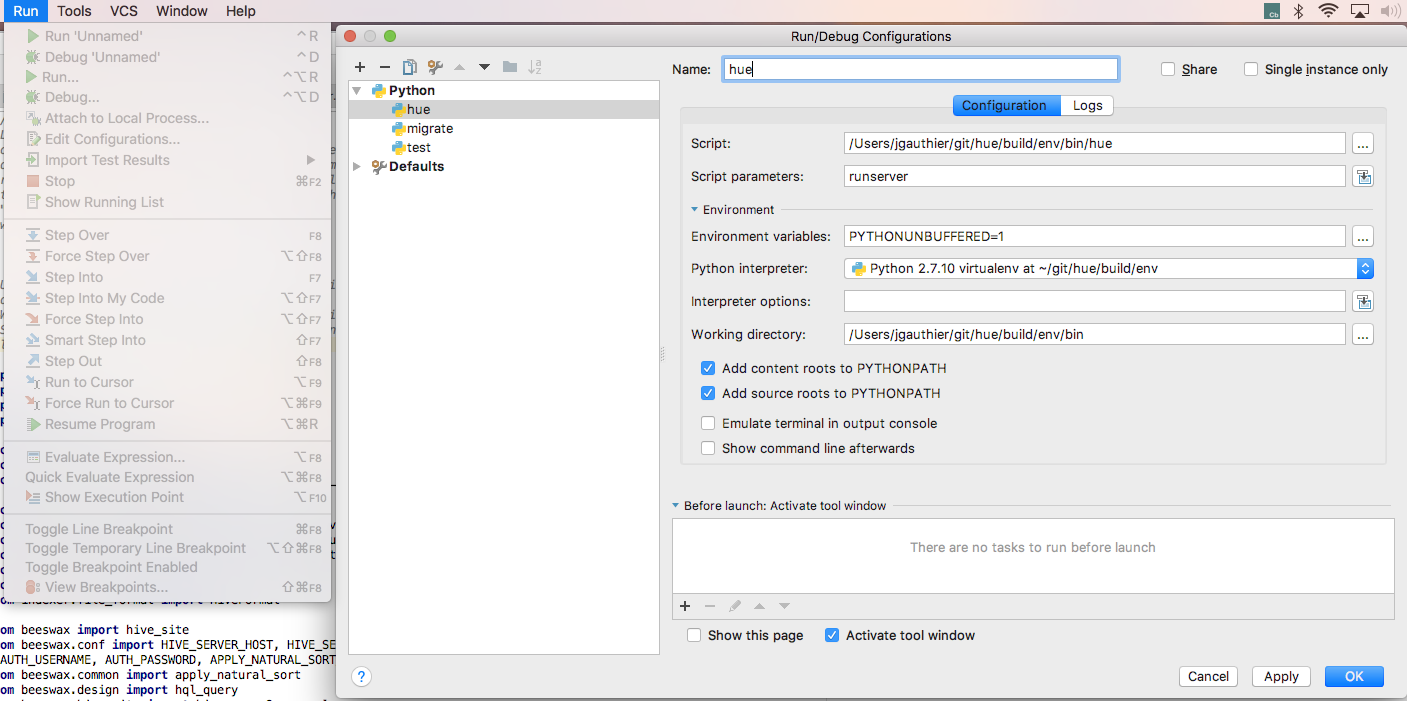
PyCharm
First step is to configure pycharm to use the Hue virtual environment at ./build/env/env
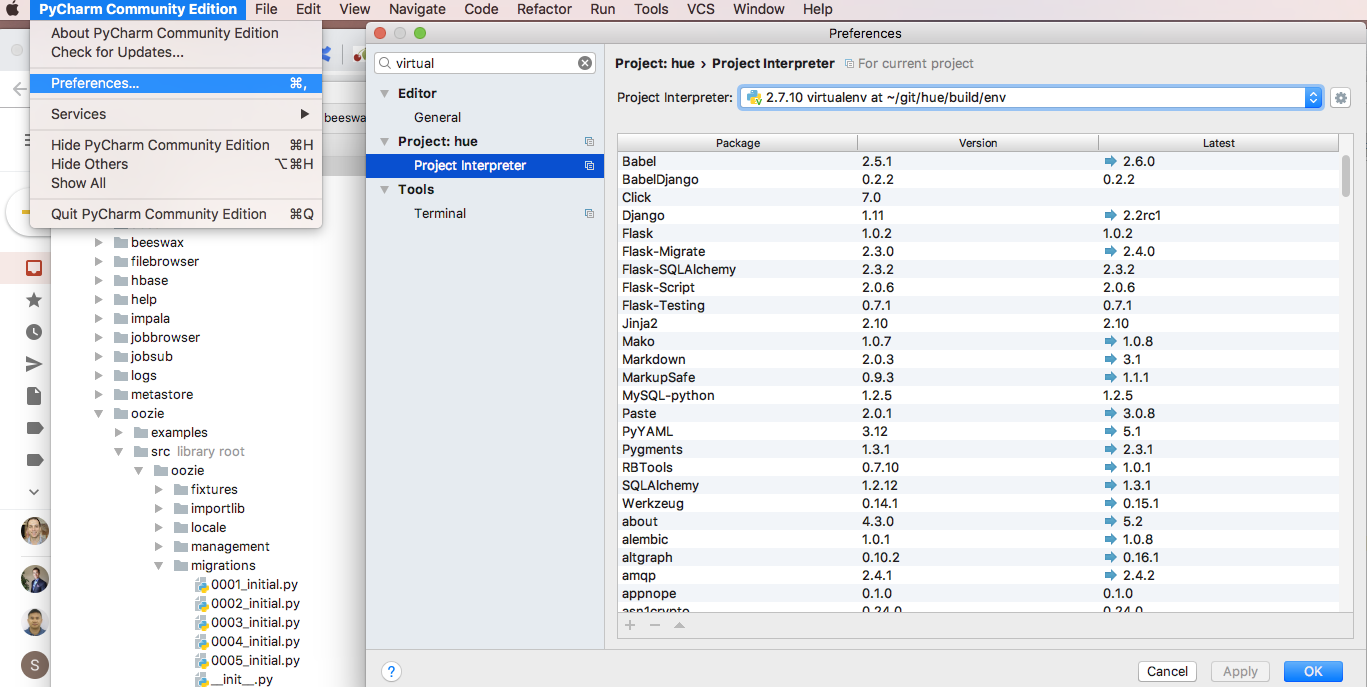
Second step is to configure the debug configuration
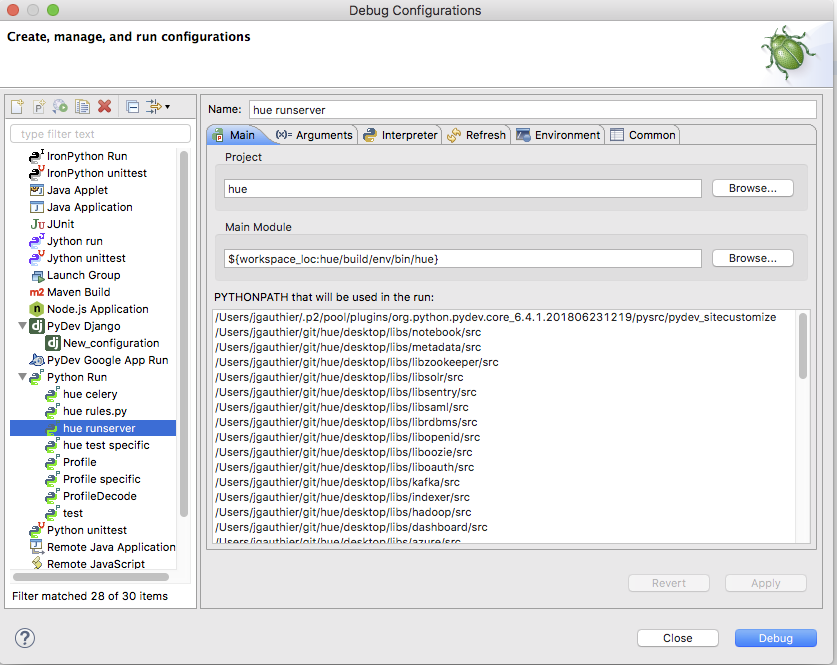
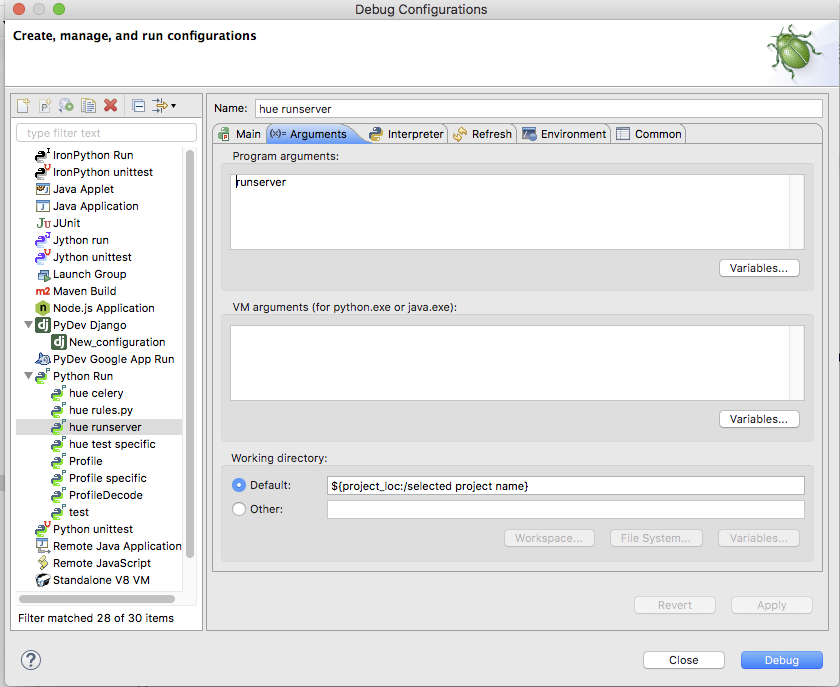
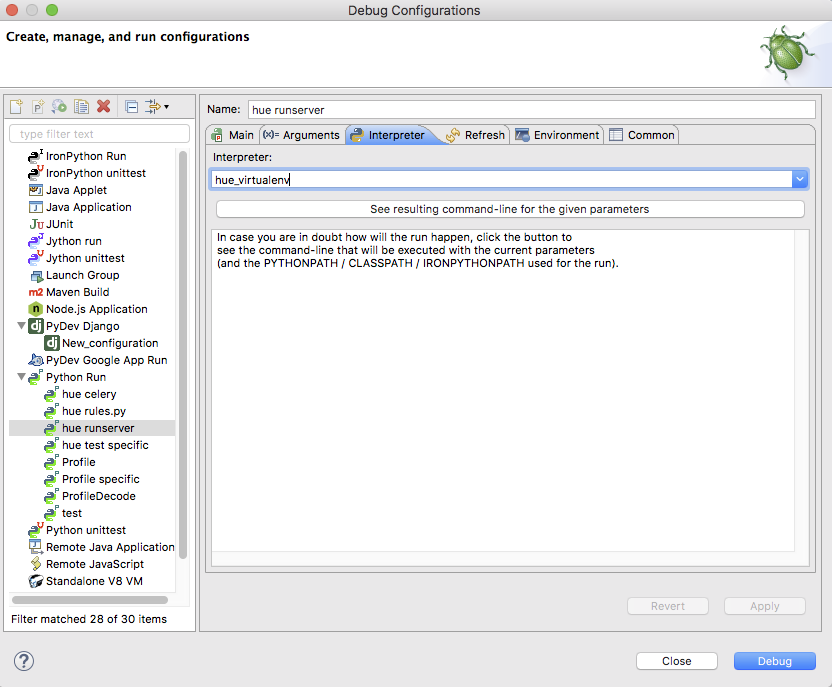
Eclipse
First step is to configure Eclipse to use the Hue virtual environment at ./build/env/env

Second step is to configure the debug configuration
Development Process
Note:
During the development process if you are facing any problem then, it is recommended to search for information on the Forum and in the bug tracker.
Here is a tutorial about how to sent a patch request for review.
Setup
Hue project uses GitHub Pull Requests (PR) for code reviews. It also automatically runs the CI (syntax check, tests…) for you.
If you've never used git and github before, there are bunch of things you need to do before going further.
Now, clone cloudera/hue:
git clone https://github.com/cloudera/hue
Create a new branch with the Github issue GH-XXX or explicit name as the branch name:
git checkout master
git pull --rebase origin master
git checkout -b GH-XXX
Then make your changes in code:
git add <file>
git diff --cached
git commit -m "GH-XXX <Ticket summary>"
Post a review
Either post via the GitHub CLI:
gh pr create --fill --assignee=romainr --web
Or push to your branch in your repository fork, e.g. if you are ‘bob’:
git remote add bob https://github.com/bob/hue
git fetch bob

git push bob HEAD:GH-1000-fix
And create the pull request to cloudera/hue via the button on the https://github.com/bob/hue/tree/GH-1000-fix page.
Note: GitHub CLI is recommended for automating even more the process. e.g. for asking reviewers and auto merging when all the checks are green:
gh pr create --fill --assignee=romainr --reviewer=agl29,Harshg999
gh pr merge --auto -r 2494
Update a review
Modify the previous commit diff:
git add <file>
git commit --amend
Update the review:
git push bob HEAD:ISSUE-1000-fix -f
And it will automatically kick the CI and notify reviewers.
Ship It
Once we get ship it from at least two reviewer, we can push the changes to master
git rebase origin/master
git push origin HEAD:ci-commit-master-<yourname>
- The push will auto run the tests and push it to master
- It can be seen on https://github.com/cloudera/hue/actions
- Two builds should be green - One for Python 3.8 and another for Python 3.9
- If successful, the change would be auto merged to master
- On failure, we will get a mail
- Runs usually take 10-20 min
- Once merged mark the review as submitted - Close > Submitted
- Add the commit link to the ticket and mark it as resolved
Sum-up
We hope that these commands will make your life easier and encourage you to contribute to Hue 😉
As usual feel free to send feedback on the Forum list or GitHub issues!
API Server
The Hue Server
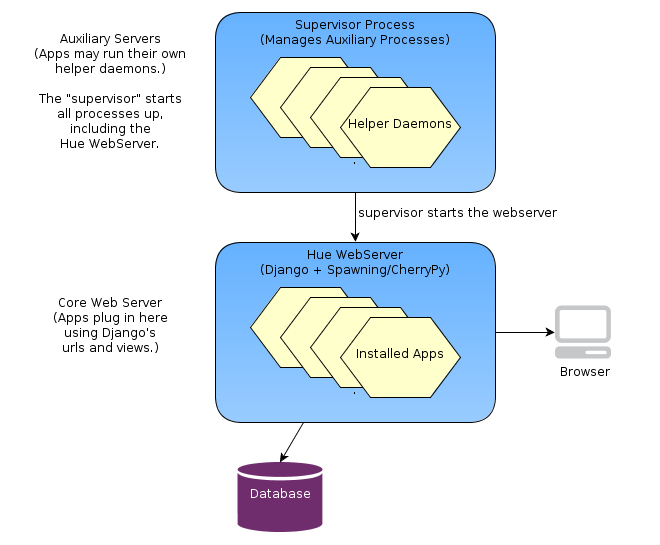
Hue is a web application built on the Django python web framework. Django, running on the WSGI container/web server (typically CherryPy), manages the url dispatch, executes application logic code, and puts together the views from their templates. Django uses a database (typically MySql or PostGres) to manage session data, and Hue applications can use it as well for their “models”. (For example, the saved Editor stores saved queries in the database.)
In addition to the web server, some Hue applications run
daemon processes “on the side”. Some examples are the Celery Task Server, Celery Beat.
File Layout
The Hue “framework” is in desktop/core/ and contains the Web components.
desktop/libs/ is the API for talking to various Hadoop services.
The installable apps live in apps/. Please place third-party dependencies in the app's ext-py/
directory.
The typical directory structure for inside an application includes:
  src/
    for Python/Django code
      models.py
      urls.py
      views.py
      forms.py
      settings.py

  conf/
    for configuration (``.ini``) files to be installed

  static/
    for static HTML/js resources and help doc

  templates/
    for data to be put through a template engine

  locales/
    for localizations in multiple languages
For the URLs within your application, you should make your own urls.py
which will be automatically rooted at /yourappname/ in the global
namespace. See apps/about/src/about/urls.py for an example.
Configurations
File
Hue uses a typed configuration system that reads configuration files (in an
ini-style format). By default, Hue loads all *.ini files in the build/desktop/conf
directory. The configuration files have the following format:
# This is a comment
[ app_name ]          # Same as your app's name
app_property = "Pink Floyd"

[[ section_a ]]         # The double brackets start a section under [ app_name ]
a_weight = 80         # that is useful for grouping
a_height = 180

[[ filesystems ]]       # Sections are also useful for making a list
[[[ cluster_1 ]]]       # All list members are sub-sections of the same type
namenode_host = localhost
# User may define more:
# [[[ cluster_2 ]]]
# namenode_host = 10.0.0.1
Variables
Your application's conf.py is special. It provides access to the configuration file (and even
default configurations not specified in the file). Using the above example, your conf.py should
define the following:
A desktop.lib.conf.Config object for app_property, such as:
MY_PROPERTY = Config(key='app_property', default='Beatles', help='blah')
You can access its value by MY_PROPERTY.get().
A desktop.lib.conf.ConfigSection object for section_a, such as:
SECTION_A = ConfigSection(key='section_a',
      help='blah',
      members=dict(
        AWEIGHT=Config(key='a_weight', type=int, default=0),
        AHEIGHT=Config(key='a_height', type=int, default=0)))
You can access the values by SECTION_A.AWEIGHT.get().
A desktop.lib.conf.UnspecifiedConfigSection object for filesystems, such as:
FS = UnspecifiedConfigSection(
    key='filesystems',
    each=ConfigSection(members=dict(
        nn_host=Config(key='namenode_host', required=True))
Saving documents
Each app used to have its own model to store its data (e.g. a saving a SQL query, query history…). All the models have been unified into a single Document2 model in the desktop app:
desktop/core/src/desktop/models.py.
The Document2 model provides automatically creation, sharing and saving. It persists the document data into a json field, which limits the need ot database migrations and simplifies the interaction with the frontend.
Document2 is based on Django Models
are Django's Object-Relational Mapping framework.
Authentication Backends
Hue exposes a configuration flag (“auth”) to configure a custom authentication backend. See writing an authentication backend for more details.
In addition to that, backends may support a manages_passwords_externally() method, returning True or False, to tell the user manager application whether or not changing passwords within Hue is possible.
Using and Installing Thrift
Right now, we check in the generated thrift code. To generate the code, you'll need the thrift binary version 0.9.0. Please download from http://thrift.apache.org/.
The modules using Thrift have some helper scripts like regenerate_thrift.sh
for regenerating the code from the interfaces.
Upgrades
After upgrading the version of Hue, running these two commands will make sure the database has the correct tables and fields.
./build/env/bin/hue migrate
Debugging Tips and Tricks
-
Set
DESKTOP_DEBUG=1as an environment variable if you want logs to go to stderr as well as to the respective log files. -
Use runserver. If you want to set a CLI breakpoint, just insert
__import__("ipdb").set_trace()into your code. -
Django tends to restart its server whenever it notices a file changes. For certain things (like configuration changes), this is not sufficient. Restart the server whole-heartedly.
-
We recommend developing with the Chrome console.
-
Special environment variables
DESKTOP_LOGLEVEL= level can be DEBUG, INFO, WARN, ERROR, or CRITICAL. When specified, the console logger is set to the given log level. A console logger is created if one is not defined.
DESKTOP_DEBUG A shorthand for DESKTOP_LOG_LEVEL=DEBUG. Also turns on output HTML validation.
DESKTOP_PROFILE Turn on Python profiling. The profile data is saved in a file. See the console output for the location of the file.
DESKTOP_LOG_DIR=$dir Specify the HUE log directory. Defaults to ./log.
DESKTOP_DB_CONFIG=$db engine:db name:test db name:username:password:host:port Specify alternate DB connection parameters for HUE to use. Useful for testing your changes against, for example, MySQL instead of sqlite. String is a colon-delimited list.
TEST_IMPALAD_HOST=impalad-01.gethue.com Point to an Impalad and trigger the Impala tests.
User Interface (UI)
Developing applications for Hue requires a minimal amount of CSS (and potentially JavaScript) to use existing functionality.
In a nutshell, front-end development is using:
- Vue.js to script the custom interactions
- TypeScript
- Bootstrap to layout your app
- Mako is the templating language (currently being removed in favor of Vue.js))
Javascript
The javascript files are currently being migrated to webpack bundles, during this process some files will live under src/desktop/static/ and some will live under src/desktop/js
For changes to the files under src/desktop/js the following applies:
First make sure all third-party dependencies defined in package.json are installed into node_modules/
npm install
Also run this after making changes to package.json, adding new third-party dependencies etc.
To generate the js bundles run:
npm run webpack
npm run webpack-workers
npm run webpack-login
During development the bundles can be autogenerated when it detects changes to the .js files, for this run:
npm run dev
Before sending a review with changes to the bundles run:
npm run lint-fix
and possibly fix any issues it might report.
CSS / LESS
Hue uses Bootstrap version 2.0 CSS styles and layouts. They are highly reusable and flexible. Your app doesn't have to use these styles, but if you do, it'll save you some time and make your app look at home in Hue.
After changing the CSS in a .less file, rebuilding with:
npm run less
Or run in watch mode that will generate the .css on any change to the .less files:
npm run less-dev
After less changes make sure linting is run with:
npm run less-lint
Icons
You should create an icon for your application that is a transparent png sized
24px by 24px. Your settings.py file should point to your icon via the ICON
variable. The create_desktop_app command creates a default icon for you.
NOTE: If you do not define an application icon, your application will not show up in the navigation bar.
Hue ships with Twitter Bootstrap and Font Awesome 4 so you have plenty of scalable icons to choose from. You can style your elements to use them like this (in your mako template):
<!-- show a trash icon in a link -->
<a href="#something"><i class="icon-trash"></i> Trash</a>
Static files
For better performances, Hue uses the Django staticfiles app. If in production mode, if you edit
some static files, you would need to run this command or make apps. No actions are needed in
development mode.
./build/env/bin/hue collectstatic
Testing
The short story
Run the API unit tests
./build/env/bin/pytest
When opening a pull request, it will automatically trigger a Github Action that includes running the unit tests.
Run the user interface tests:
npm run test
Running the API tests
In the pyproject.toml file, we define the configuration for pytest, including settings to enable pytest to discover and execute the unit tests.
For pytest to recognize test files, you should follow the naming convention *_test.py or test_*.py. Following the pytest framework convention for test discovery is recommended. Pytest will gather test items according to the following rules:
- Test functions or methods prefixed with test_ outside of a class.
- Test functions or methods prefixed with test_ inside classes prefixed with Test.
You can refer to desktop/libs/notebook/src/notebook/connectors/trino_tests.py for an example of how tests are organized.
To run the unit tests with pytest (should not take more than 5-10 minutes):
./build/env/bin/pytest
To run the tests of a particular app, use:
./build/env/bin/pytest test_app_path
e.g.
./build/env/bin/pytest apps/filebrowser
To run the tests of a specific class, use:
./build/env/bin/pytest test_file_path::class
e.g.
./build/env/bin/pytest apps/useradmin/src/useradmin/tests.py::TestUserAdmin
To run a specific test in a class, use:
./build/env/bin/pytest test_file_path::class::function
e.g.
./build/env/bin/pytest apps/useradmin/src/useradmin/tests.py::TestUserAdmin::test_user_admin
Note:
When running the tests and seeing an error similar to:
...
ValueError: The file 'desktop/js/bundles/hue/vendors~hue~notebook~tableBrowser-chunk-f7c8562ecf79bc8f1f16.js' could not be found with <django.contrib.staticfiles.storage.CachedStaticFilesStorage object at 0x7faf77042630>.
Re-building the collection of static files should fix it:
./build/env/bin/hue collectstatic
Running the UI tests
The tests are next to the file under test, the filename of the test has to end with .test.ts or .test.js.
someFile.js         <- File under test
someFile.test.ts    <- File containing tests
Run all the tests once with:
npm test
Run tests from a specific file once:
npm test -- foo.test.js
To run the tests in watch mode:
npm run test-dev
While in watch mode Jest will detect changes to all files and re-run related tests. There are also options to target specific files or tests. Press ‘w’ in the console to see the options.
In order to update the test snapshots, let the first checks of tests complete and then press ‘u’ in the console to update the snapshots.
Note: on certain OS like Ubuntu, running the tests via a global jest seems to not hang your system
npm install jest --global
e.g.
jest calciteAutocompleteParser.Select.stream.test.js --testPathIgnorePatterns=[]
jest calciteAutocompleteParser --testPathIgnorePatterns=[]
How to update snapshot tests:
jest --updateSnapshot
Testing KO Js components
koSetup provides utilities to test Knockout components and bindings using jsdom from jest.
An example of component test:
import { koSetup } from 'jest/koTestUtils';

import 'ko/someComponent';

describe('ko.someComponent.js', () => {
  const setup = koSetup(); // Adds the necessary setup and teardown

  it('should render component', async () => {
    const someParams = {}

    const element = await setup.renderComponent('someComponent', someParams);

    expect(element.innerHTML).toMatchSnapshot();
  });

  it('should change after observable update', async () => {
    const someParams = { visible: ko.observable(false) };
    const wrapper = await setup.renderComponent('someComponent', someParams);
    expect(wrapper.querySelector('[data-test="some-test-id"]').style['display']).toEqual('none');

    someParams.visible(true); // Or trigger some event on an elmement etc.
    await setup.waitForKoUpdate(); // Waits for re-render

    expect(wrapper.querySelector('[data-test="some-test-id"]').style['display']).toEqual('inline-block');
  });
});
An example of a binding test:
import ko from 'knockout';
import { koSetup } from 'jest/koTestUtils';
import './ko.myBinding';

describe('ko.myBinding.js', () => {
  const setup = koSetup();

  it('should toggle observable', async () => {
    const viewModel = { testObservable: ko.observable(false) };
    const wrapper = await setup.renderKo(
      '<div class="click-test" data-bind="myBinding: testObservable"></div>',
      viewModel
    );

    expect(viewModel.testObservable()).toBeFalsy();

    wrapper.querySelector('.click-test').click();
    await setup.waitForKoUpdate();

    expect(viewModel.testObservable()).toBeTruthy();
  });
});
Coverage
Add the following options:
./build/env/bin/pytest --cov=.
Note: Before proceeding, ensure you have installed the pytest-cov package.
For js run:
npm run test-coverage
Python Linting
Hue uses Ruff for linting its backend codebase. The Ruff related configs can be found in the pyproject.toml file present at the project root.
The Github Action CI checks are also leveraging the Ruff linting on branch updates and pull requests.
To manually check for linting violations on the modified files, run:
./build/env/bin/hue runruff check
The above command will lint all the files modified w.r.t origin/master by default and to change the base branch for finding all modified files, simply add the --diff-branch=<new_base_branch> argument like below:
./build/env/bin/hue runruff check --diff-branch=<new_base_branch>
Ruff can also autofix most of the flagged violations:
./build/env/bin/hue/runruff check --fix
Some flagged violations can't be autofixed by Ruff and requires manual fixing. Other Ruff supported commands are listed here
Integration tests
To not fail on integration tests, Hue would need to be configured to point to a live cluster, or you could install the mini cluster (only once) with:
./tools/jenkins/jenkins.sh slow
Note: the integration tests are going to be ported to a more modern CI with dependencies provided by containers.
Those are tagged with integration either at the class or method level:
class BeeswaxSampleProvider(object):
  integration = True

  @attr('integration')
  def test_add_ldap_users_case_sensitivity(self):
    if is_live_cluster():
      raise SkipTest('GH-2897: Cannot yet guarantee database is case sensitive')

    ...
Releasing
The checklist below details the steps. Then send the release notes to the Forum and https://twitter.com/gethue!
Also update https://wikipedia.org/wiki/Hue_(Software).
Version
Here is an example of release commit.
Update the versions to the next release (current release +1):
:100644 100644 4db6d5f... f907d04... M	VERSION
:100644 100644 9332f95... 45b28ad... M	desktop/libs/librdbms/java/pom.xml
:100644 100644 551f62f... 694f021... M	maven/pom.xml
:100644 100644 658d54a... 671ce01... M  package.json
How to count the number of commits since the last release:
git log --oneline --since=2020-01-01 | grep 'release' -n -i
git log --oneline -449 > commits.txt

cat commits.txt | sed 's/^\([[:alnum:]]\{10\}\)/\[\1\]\(https:\/\/github.com\/cloudera\/hue\/commit\/\1\)/' | sed 's/^\(.*\)/* \1/' > commits.md
And add them and the authors to the release notes:
git log --pretty="%an" | sort | uniq | sed 's/^\(.*\)/* \1/' > authors.txt
Git
Pushing the release branch:
git push origin HEAD:branch-4.11.0
Tagging the release:
git tag -a release-4.11.0 -m "release-4.11.0"
git push origin release-4.11.0
Draft a new release on https://github.com/cloudera/hue/releases.
Publish Github NPM package and Docker images at https://github.com/orgs/cloudera/packages?repo_name=hue.
Tarball
Building the tarball release:
git checkout -b release-4.11.0 release-4.11.0
export PYTHON_VER=python3.8
make prod
You might need to upgrade the Mysqlclient if seeing:
_mysql.c:44:10: fatal error: my_config.h: No such file or directory
  44 | #include "my_config.h"
      |          ^~~~~~~~~~~~~
Source of the release: https://github.com/cloudera/hue/archive/release-4.11.0.zip
Push to the CDN:
scp hue-4.11.0.tgz [email protected]:/var/www/cdn.gethue.com/downloads
Docker
Docker images are at https://hub.docker.com/u/gethue/
docker build https://github.com/cloudera/hue.git#release-4.11.0 -t gethue/hue:4.11.0 -f tools/docker/hue/Dockerfile
docker tag gethue/hue:4.11.0 gethue/hue:latest
docker images
docker login -u gethue
docker push gethue/hue
docker push gethue/hue:4.11.0

docker build https://github.com/cloudera/hue.git#release-4.11.0 -t gethue/nginx:4.11.0 -f tools/docker/nginx/Dockerfile;
docker tag gethue/nginx:4.11.0 gethue/nginx:latest
docker push gethue/nginx
docker push gethue/nginx:4.11.0
Kubernetes / Helm
To build the chart, use the package command from the Helm root directory:
cd hue/tools/kubernetes/helm/
helm package hue
Then to publish it to the outside via the current Apache server:
scp hue-1.0.1.tgz [email protected]:/var/www/helm.gethue.com
Then connect to the server and index the package:
ssh [email protected]
cd /var/www/helm.gethue.com
helm repo index .
Pypi
The Python API and CLI (and soon API) are being transitioned to https://github.com/gethue/compose which host the compose and compose-admin commands.
How to update the repo https://pypi.org/project/gethue/:
rm -rf dist && python3 -m build && python3 -m twine upload dist/*

python3 -m pip install gethue --upgrade
Note:
A Pypi token will be needed. For doing a test release https://test.pypi.org/project/gethue/ is handy:
python3 -m pip install --upgrade build

rm -rf dist && python3 -m build && python3 -m twine upload --repository testpypi dist/*
python3 -m pip install --index-url https://test.pypi.org/simple/ gethue --upgrade
Documentation
Documentation is currently being auto refreshed every morning of the week and run as a container.
The manual process otherwise would be to build it and push it to the docs host.
The resources like images go to the CDN:
scp before_raz_adls.png after_raz_adls.png [email protected]:/var/www/cdn.gethue.com/uploads/2021/09/
NPM registry
To publish gethue to the NPM registry, the following command would have to be run.
npm run publish-gethue
Building
Custom Webpack Config
You can make webpack build with custom configuration files by setting HUE_WEBPACK_CONFIG environment variable.
HUE_WEBPACK_CONFIG="webpack.config.custom.js" make apps
Dev Docker
Try basic changes in 3 minutes without compiling Hue locally hence avoiding the setting up of dependencies:
git clone https://github.com/cloudera/hue.git
cd hue
cp desktop/conf/pseudo-distributed.ini.tmpl desktop/conf/pseudo-distributed.ini
Then edit the [[database]] section to specify a proper database, here MySql:
host=127.0.0.1 # Don't use 'localhost' if Docker
engine=mysql
user=hue
password=hue
name=huedb
Then map the local Hue source code into the running container (so that local edits are seen in the running Hue):
sudo docker run -it -v $PWD/apps:/usr/share/hue/apps -v $PWD/desktop:/usr/share/hue/desktop -v $PWD/desktop/conf/pseudo-distributed.ini:/usr/share/hue/desktop/conf/z-hue.ini --network="host" gethue/hue
Note: code updates won’t be seen after the Docker container runs. For this Hue would need to be started in dev server mode by replacing the line by
./build/env/bin/hue runserver 0.0.0.0:8888
and recompiling the Docker image. It will then auto-restart on Python code changes. For JavaScript, those would need to be compiled.
Documentation
Install Hugo. Each page has a link to its own source file in the top right corner.
Build the source and see live changes:
cd docs/docs-site

hugo serve
Check for links not working (e.g. returning a 404) with muffet, a fast link checker crawler. It recommended to use the check links script.
The posts manual and continuous integration contain more information about it.
And then to build the static site just do:
hugo
and grab the public directory.
gethue.com Blog & Website
Like for the Documentation install hugo. The content for each language is in its own directory.
Blog posts are located in docs/gethue/content/en/posts. Here is an example of the source of a release post.
Build it and see live changes:
cd docs/gethue

hugo serve
Will automatically start one server for each language domain.
gethue.com refresh is currently manually kicked but this will be automated soon.
SQL Autocomplete
Install a patched jison:
git clone https://github.com/JohanAhlen/jison
cd jison
npm install -g .
Then run:
make sql-all-parsers
Ace Editor
After modifying files under tools/ace-editor run the following to build ace.js
npm install
make ace
Language references
The tools for generating the embedded language reference manuals can be found under hue/tools/sql-docs/
Hive
The Hive documentation is generated directly from the Hive wiki by using an exported epub file.
-
Goto https://cwiki.apache.org/confluence/display/Hive/LanguageManual
-
Click the three dots ‘…’ in the upper right corner
-
Click ‘Export to EPUB’
-
In the Hue folder run:
node tools/sql-docs/hiveExtractor.js --epub /path/to/epub/file
Impala
The Impala documentation is generated from the ditamap files in the Impala GitHub repo.
-
Clone the Impala repo next to hue from https://github.com/apache/impala
-
In the Hue folder run:
node tools/sql-docs/docExtractor.js -c hue -f ../impala/docs/ -d impala_langref.ditamap,impala_keydefs.ditamap,impala.ditamap -o desktop/core/src/desktop/static/desktop/docs/impala/ -m desktop/core/src/desktop/templates/impala_doc_index.mako
Internationalization
How to update all the messages and compile them:
make locales
How to update and compile the messages of one app:
cd apps/beeswax
make compile-locale
How to create a new locale for an app:
cd $APP_ROOT/src/$APP_NAME/locale
$HUE_ROOT/build/env/bin/pybabel init -D django -i en_US.pot -d . -l fr
SQL Parsers
The parsers are the flagship part of Hue and power extremely advanced autocompletes and other SQL functionalities. They are running on the client side and comes with just a few megabytes of JavaScript that are cached by the browser. This provides a very reactive experience to the end user and allows to import them as classic JavaScript modules for your own development needs.
While the dynamic content like the list of tables, columns is obviously fetched via remote endpoints, all the SQL knowledge of the statements is available.
The main dialects are:
- Apache Hive
- Apache Impala
- Presto
- Apache Calcite
But there are more! See all the currently shipped SQL dialects.
This guide takes you through the steps necessary to create an autocompleter for any SQL dialect in Hue. The major benefits are:
- Proposing only valid syntax in the autocomplete
- Getting the list of tables, columns, UDFs… automatically
- Suggesting fixes
- Diffing, formatting… queries
Looking at quick code examples?
Parser Theory
There are several parsers in Hue already (e.g. one for Impala, one for Hive..) and a generic SQL that is used for other dialects. The parsers are written using a bison grammar and are generated with jison. They are 100% Javascript and live on the client side, this gives the performance of a desktop editor in your browser.
Building a dedicated work is more effort but it then allows a very rich end user experience, e.g.:
- Handle invalid/incomplete queries and propose suggestions/fixes
- date_column = <Date compatible UDF …>
- Language reference or data samples just by pointing the cursor on SQL identifiers
- Leverage the parser for risk alerts (e.g. adding automatic LIMIT) or proper re-formatting
Structure
Normally parsers generate a parse tree but for our purposes we don’t really care about the statement itself but rather about what should happen when parts of a particular statement is encountered. During parsing the state is kept outside the parse tree and in case of syntax errors this enables us to provide some results up to the point of the error. There are two ways that incomplete/erroneous statements are handled, first we try to define most of the incomplete grammar and secondly we rely on the “error” token which allows the parser to recover.
The parsers provide one function, parseSql, that accepts the text before the cursor and the text after the cursor as arguments. The function returns an object containing instructions on what to suggest given the input.
As an example:
sqlParserRepository.getAutocompleteParser('impala').then(parser => {
  console.log(parser.parseSql('SELECT * FROM customers'));
});
Would output something like:
{
  definitions: [],
  locations: (6) [{…}, {…}, {…}, {…}, {…}, {…}],
  lowerCase: false,
  suggestAggregateFunctions: {tables: [Array(1)]},
  suggestAnalyticFunctions: true,
  suggestColumns: {source: "select", tables: [{identifierChain: [{name: "customers"}]}]},
  suggestFunctions: {},
  suggestKeywords: (8) [{…}, {…}, {…}, {…}, {…}, {…}, {…}, {…}]
}
We take this output and link it to various sources of metadata to provide the list of suggestions the user finally sees. In this case we’d use the data from “suggestColumns” to call the backend for all the columns of the “customers” table. We’d also use the functions library to list all the UDFs etc.
Here’s a list of some of the different types of suggestions the parser can identify:
suggestAggregateFunctions
suggestAnalyticFunctions
suggestColRefKeywords
suggestColumnAliases
suggestColumns
suggestCommonTableExpressions
suggestDatabases
suggestFilters
suggestFunctions
suggestGroupBys	suggestHdfs
suggestIdentifiers
suggestJoinConditions
suggestJoins
suggestKeywords
suggestOrderBys
suggestSetOptions
suggestTables
suggestValues
Parsers are generated and added to the repository using the command generateParsers.js under tools/jison/. To for instance generate all the Impala parsers you would run the following command in the hue folder:
cd tools/jison
node generateParsers.js impala
In reality two parsers are generated per dialect, one for syntax and one for autocomplete. The syntax parsers is a subset of the autocomplete parser with no error recovery and without the autocomplete specific grammar.
All the jison grammar files can be found here and the generated parsers are also committed together with their tests here.
Parsers are sharing a maximum of the common syntax via some modules so that it is easy to improve the specificness of any of them while not starting from sratch.
e.g. in structure.json:
{
  "lexer": "sql.jisonlex",
  "autocomplete": [
    "../generic/autocomplete_header.jison",
    "abort/abort_transactions.jison",
    "common/table_constraint.jison",
    "alter/alter_common.jison",
    "alter/alter_database.jison",
    "alter/alter_index.jison",
    "alter/alter_materialized_view.jison",
    "alter/alter_table.jison",
    "alter/alter_view.jison",
    "analyze/analyze_table.jison",
    ...
  ],
  "syntax": [
    "../generic/syntax_header.jison",
    "abort/abort_transactions.jison",
    "common/table_constraint.jison",
    "alter/alter_common.jison",
    "alter/alter_database.jison",
    "alter/alter_index.jison",
    "alter/alter_materialized_view.jison",
    ...
  ]
}
The grammar
In a regular SQL parser you might define the grammar of a select statement like this:
SelectStatement
  : 'SELECT' ColumnList 'FROM' Identifier
  ;

ColumnList
  : Identifier
  | ColumnList ',' Identifier
  ;
This would be able to parse a statement like ‘SELECT a, b, c FROM some_table’ (depending on lexer definitions of course).
Notion of cursor
To turn this into an autocompleter we add the notion of a cursor. Often, the user has the cursor somewhere in the statement. In the previous section, we were assuming that the query was already typed and the user had not mouse cursor within it.
The cursor is represented as an obscure character that is unlikely to be used in a statement. Currently ‘\u2020’ was picked, the dagger, identified as ‘CURSOR’ in the lexer. The actual parsed string is therefore beforeCursor + ‘\u2020’ + afterCursor.
For the statement above we’d add an extra rule with an _EDIT postfix like this:
SelectStatement
  : 'SELECT' ColumnList 'FROM' Identifier
  ;

SelectStatement_EDIT
  : 'CURSOR' --> { suggestKeywords: ['SELECT'] }
  | 'SELECT' ColumnList_EDIT
  | 'SELECT' ColumnList 'CURSOR' --> { suggestKeywords: ['FROM'] }
  | 'SELECT' ColumnList 'FROM' 'CURSOR'  --> { suggestTables: {} }
  | 'SELECT' ColumnList_EDIT 'FROM' Identifier --> { suggestColumns: { table: $4 } }
  ;
So for example if a cursor without any text is encountered, it will tell us to suggest the ‘SELECT’ keyword etc.
Why an extra space
The extra space is just for the documentation to show the complete output with locations, it should indeed be clarified a bit. The reason for the extra space is that the parser ignores partial words, consider the following where | denotes the cursor:
SELECT * FROM som|
The parser will treat this as “SELECT * FROM |” and it leaves it up to the editor logic to filter any tables, starting with “som”.
Tutorial: Creating a parser
The goal is to create from scratch a new parser for the PostgreSQL database.
Prerequisites
Make sure you have jison installed and a development Hue. Then configure a PostgreSQL interpreter.
In the Hue folder:
./build/env/bin/pip install psycopg2-binary
and edit your hue config desktop/conf/pseudo-distributed.ini to contain:
[notebook]
[[interpreters]]
[[[postgresql]]]
name = postgresql
interface=sqlalchemy
options='{"url": "postgresql://hue:hue@localhost:31335/hue"}'
Our generateParsers tool can take an existing dialect and setup the source code for a new parsers based on that.
In the hue folder run:
cd tools/jison
npm install
node generateParsers.js -new generic postgresql
After the -new argument you specify an existing dialect to clone first and then the name of the new parser.
Once executed the tool has cloned the generic parser with tests and generated a new postgresql parsers. The jison files can be found under desktop/core/src/desktop/js/parse/jison/sql/postgresql/ and the testscan be found in desktop/core/src/desktop/js/parse/sql/postgresql/test.
To regenerate the parsers after changes to the jison files run:
cd tools/jison
node generateParsers.js postgresql
The tool will report any problems with the grammar. Note that it might still generate a parser if the grammar isn’t ambiguous but it’s likely that there will be test failures.
Extending the grammar
This gives you an idea on how to add custom syntax to the newly generated postgresql parser. For this example we’ll add the REINDEX statement as it’s quite simple.
REINDEX { INDEX | TABLE | DATABASE | SYSTEM } name [ FORCE ]
We’ll start by adding a test, in postgresqlAutocompleteParser.test.js in the test folder inside the main describe function before the first it('should...:
describe('REINDEX', () => {
  it('should handle "REINDEX TABLE foo FORCE; |"', () => {
    assertAutoComplete({
      beforeCursor: 'REINDEX TABLE foo FORCE;  ',
      afterCursor: '',
      noErrors: true,
      containsKeywords: ['SELECT'],
      expectedResult: {
        lowerCase: false
      }
    });
  });

  it('should suggest keywords for "REINDEX |"', () => {
    assertAutoComplete({
      beforeCursor: 'REINDEX ',
      afterCursor: '',
      noErrors: true,
      containsKeywords: ['INDEX', 'DATABASE'],
      expectedResult: {
        lowerCase: false
      }
    });
  });
});
When we now run npm run test -- postgresqlAutocompleteParser.test.js there should be two failing tests.
Alternatively, if using Jest directly and working on parsers currently being skipped in the CI, provide matching file names and an empty blacklist file pattern. e.g.:
jest calciteAutocompleteParser.Select.stream.test.js --testPathIgnorePatterns=[]
jest calciteAutocompleteParser --testPathIgnorePatterns=[]
Next we’ll have to add the keyword to the lexer, let’s open sql.jisonlex in the jison folder for postgresql and add the following new tokens:
'REINDEX'                                  { parser.determineCase(yytext); return 'REINDEX'; }
'INDEX'                                    { return 'INDEX'; }
'SYSTEM'                                   { return 'SYSTEM'; }
'FORCE'                                    { return 'FORCE'; }
Now let’s add the grammar, starting with the complete specification. For simplicity we’ll add it in sql_main.jison, at the bottom of the file add:
DataDefinition
: ReindexStatement
;

ReindexStatement
: 'REINDEX' ReindexTarget RegularOrBacktickedIdentifier OptionalForce
;

ReindexTarget
: 'INDEX'
| 'TABLE'
| 'DATABASE'
| 'SYSTEM'
;

OptionalForce
:
| 'FORCE'
;
“DataDefinition” is an existing rule and this extends that rule with “ReindexStatement”.
Save the files and first run node tools/jison/generateParsers.js postgresql then npm run test -- postgresqlAutocompleteParser.test.js and we should be down to one failing test.
For the next one we’ll add some keyword suggestions after the user has typed REINDEX, we’ll continue below the ReindexStatement in sql_main.jison:
DataDefinition_EDIT
: ReindexStatement_EDIT
;

ReindexStatement_EDIT
: 'REINDEX' 'CURSOR'
  {
    parser.suggestKeywords(['DATABASE', 'INDEX', 'SYSTEM', 'TABLE']);
  }
;
Again, run cd tools/jison/; node generateParsers.js postgresql then npm run test -- postgresqlAutocompleteParser.test.js and the tests should both be green.
We also want the autocompleter to suggest the keyword REINDEX when the user hasn’t typed anything, to do that let’s first add the following test with the other new ones in postgresqlAutocompleteParser.test.js:
it('should suggest REINDEX for "|"', () => {
  assertAutoComplete({
    beforeCursor: '',
    afterCursor: '',
    noErrors: true,
    containsKeywords: ['REINDEX'],
    expectedResult: {
      lowerCase: false
    }
  });
});
For this to pass we need to add REINDEX to the list of DDL and DML keywords in the file sqlParseSupport.js next to the generated parser (desktop/core/src/desktop/js/parse/sql/postgresql/sqlParseSupport.js/). Find the function parser.suggestDdlAndDmlKeywords and add ‘REINDEX’ to the keywords array. Now run npm run test -- postgresqlAutocompleteParser.test.js and the three tests should pass.
Before you continue further, note that in this case there will be two new failing tests where the keyword ‘REINDEX’ has to be added.
In order to use the newly generated parsers we have to add them to the webpack bundles:
npm run webpack
npm run webpack-workers
While developing it will speed up if the webpack bundling runs in the background, for this open two terminal sessions and run npm run dev in one and npm run dev-workers in the other. It will then monitor changes to the files and build a lot quicker.
After the bundling you can now test it directly in the editor!
Syntax highlighting
New keywords might not be properly colored highlighted in the editor. This is especially true when adding a new language. Here is how to fix that.

Missing highlighting for ‘REINDEX’ keyword

With correct highlighting
Updating keywords
The Editor is currently visually powered by Ace. The list of supported languages is found in the mode directory.
For each dialect, we have two files. e.g. with PostgreSQL:
pgsql.js
pgsql_highlight_rules.js
The list of keywords is present in *_highlight_rules.js and can be updated there.
var keywords = (
    "ALL|ALTER|REINDEX|..."
)
Afterwards, run:
make ace
And after refreshing the editor page, the updated mode will be activated.
Adding new dialect
To add a new dialect, it is recommended to copy the two files of the closest mode and rename all the names inside. For example, if we were creating a new ksql mode, pgsql_highlight_rules.js would become ksql_highlight_rules.js and we would rename all the references inside to psql to ksql. Same with pgsql.js to ksql.js. In particular, the name of the mode to be referenced later is in:
KsqlHighlightRules.metaData = {
  fileTypes: ["ksql"],
  name: "ksql",
  scopeName: "source.ksql"
};
Tip: inheritance of modes is supported by Ace, which make it handy for avoiding potential duplications.
In the Editor, the mapping between Ace's modes and the type of snippets is happening in editor_components.mako.
In the KSQL case we have:
ksql: {
  placeHolder: '${ _("Example: SELECT * FROM stream, or press CTRL + space") }',
  aceMode: 'ace/mode/ksql',
  snippetIcon: 'fa-database',
  sqlDialect: true
},
And cf. above prerequisites, any interpreter snippet with ksql will pick-up the new highlighter:
[[[ksql]]]
name=KSQL Analytics
interface=ksql
Reusing a parser in your project
The parsers ship as a pluggable component.
Connectors
Connectors provide pluggable integration to any external data service so that an admin can easily allow end users to interact with them.
- List of all the existing connectors
- Check “Potential connectors” ideas in each section
- Feel free to contact the community
Databases
SqlAlchemy
SqlAlchemy is the prefered way if the Hive API is not supported by the database. The core implementation is in sql_alchemy.py and relies on each respective SqlAlchemy dialect.
Hive Interface
This asynchronous API based on the Thrift API of Hive is very mature and powers an excellent integration of Apache Hive and Apache Impala.
Custom
If the built-in HiveServer2 (Hive, Impala, Spark SQL), SqlAlchemy (MySQL, PostgreSQL, Oracle, Presto…) don’t meet your needs, you can implement your own connector to the notebook app:
-
List of all connectors
-
Each connector API subclasses the Base API and must implement the methods defined within. Refer to the JDBC or RdbmsApi for representative examples
The JDBC API relies on a small JDBC proxy running next to the Hue API. By default it won't be built without setting the BUILD_DB_PROXY flag, e.g.:
export BUILD_DB_PROXY=true make install
Note In the long term, SqlAlchemy is prefered as more “Python native”.
Potential connectors
It is recommended to develop an SqlAlchemy connector if yours is not already existing.
Catalogs
The backends is pluggable by providing alternative client interfaces:
- Apache Atlas
- Cloudera Navigator
- Dummy (skeleton for integrating new catalogs)
Apache Atlas
Potential connectors
- Linkedin DataHub
- Lift Amundsen
- AWS Glue
- Google Cloud Data Catalog
- Alation
Storages
Various storage systems can be interacted with. The fsmanager.py is the main router to each API.
Note Apache Ozone as well as Ceph can be used via the S3 browser.
Hadoop HDFS
AWS S3
Azure ADLS
HBase / Key Value Stores
With just a few changes in the Python API, the HBase browser could be compatible with Apache Kudu or Google Big Table.
Potential connectors
- Google Cloud Storage is currently a work in progress with HUE-8978
Jobs
Apache Spark / Livy
Based on the Livy REST API.
- Notebook connector
- PySpark
- Scala
- Spark SQL
- Batch connector
Schedulers
Currently only Apache Oozie is supported for your Datawarehouse, but the API is getting generic with HUE-3797.
Potential connectors
- Elastic Search: a connector similar to Solr for Searching HUE-7828. SQL querying is already supported.
- Livy Browser API
- Celery API
- Apache Hive native support of query scheduling HIVE-21884